Monday, September 20, 2010

Stash game!

About 3 years ago, I joined a sewing message board, but I visited it very infrequently.  At the time, I was just beginning to sew and it was a bit overwhelming.  But my friend Jacki is a regular there and always talked about this game they do, where the goal is to reduce your fabric stash and NOT buy new fabric.  Since my fabric hoarding has been getting a bit out of hand lately, I figured it'd be good motivation to finally make all the projects I've been planning. 

Basically, the rules are that starting on September 1st, you get points per yard for anything you sew and lose points for fabric that you buy.  Anything you bought or ordered before the 1st counts as part of your current "stash," but you can't actually start cutting fabric for the item until then either.  So anything you started before the 1st counts as an "Unfinished Object."  I spent the entire week beforehand planning and tracing patterns that I wanted to use.  I also might have gone on a fabric-buying spree.  I know, defeats the purpose of reducing the stash, but I couldn't help myself.

Anyways, here are the first few batches of things I made.  Nothing major yet, but I knew I'd have more costumes to make, so I wanted to start off slow.

First up, a Halloween skirt for E!  She's been very into twirling lately, so I wanted to make her a nice, full twirly skirt.  I used the PortabelloPixie Gracie pattern for this, but either I cut it wrong or there's something wonky with it because the top tier and the waistband didn't seem to match up quite right.

photo

Here she is, giving it a test twirl. I think it met with her approval.  :)

photo 

I also whipped up an absolute TON of key fobs to sell and give as gifts.  These are actually pretty fast and fun to make.  I enlisted T to put the rings on so we had a little assembly line going.  This is actually only about half of them.

photo 

Last, and sort of least, I made a quick little placemat for E to use at school.  Nothing really fancy, just two rectangles (and interfacing) that I sewed right sides together, then turned and top-stitched. I used the same fabrics as on her nap mat, and I also added a piece of elastic to hold it closed when rolled up.

photo

More to come...

Thursday, September 2, 2010

Finally, the nap mat tutorial!

Confession: I actually started this tutorial last summer.  I had all the materials cut and ready to go, but then time got the better of me and I never finished it.  Also, my child developed a sudden attachment to her old nap mat and rejected the idea of a new one (even after specifically picking out this fabric).  So I decided to not bother sewing a new one and shelved the tute for another time.  I didn't mean to wait quite this long, but hey, better late than never, right?
Anyways, two years ago, when I first decided to sew E a nap mat for school, I was surprised to discover how few tutorials were out there. The one that seemed to come up the most was this tutorial by Jenny Garland. I made one from that tute for my friend's daughter, but I had a really hard time with it - I will concede though that that had a lot more to do with my sewing inexperience than the tutorial itself. Difficulty aside, I knew that particular style wouldn't work for what E's school required (they had a lot of rules and guidelines). Long story short, I ended up coming up with something on my own in a backwards sort of way. You can check out the old one in this post.

Even though she is going to a new school this year and will not be using a vinyl Kindermat underneath, I decided to make one in a similar style to her old one, which is only lightly padded.  That being said, if you are concerned about the mat being directly on a hard floor or you just generally prefer something more plush, then you may want to try Jenny's tutorial instead. But if you want something more compact to take on trips, to friends' or relatives' houses, or to use on carpet or a bed, then this might be more up your alley. Another bonus of this nap mat? It's completely machine-washable!

When I came back to this project, I realized I forgot to account for the fact that kids have a pesky way of growing taller and my initial design is now a bit too short.  So to compensate, I have lengthened it a bit and added a detachable pillow which can be flipped down for littler ones, and then flipped up as they grow.  Hopefully, this will be the last one I make for a while.

So all that being said, here is the tute! I'm still rather new at writing up tutorials, so any comments or suggestions are appreciated!  Oh and I apologize in advance if the pictures are confusing - I realized after finishing the first one that I didn't take enough and took some of the next one I made.

This tutorial is for personal use only, please don't sell from it. I'd love a linkback too if you post what you make from it! ;)


Materials needed:
1 1/2 yards Top (inside) fabric
1 1/2 yards Bottom (outside) fabric (*see note at bottom if you want to use the same fabric for both sides)
1 yard fleece (for the blanket)
Poly-fil or other polyester fiberfill (for the pillow)
1 yard of 1" wide nylon webbing
Approx 12 inches of 1" wide velcro
1 package crib-size (45x60) quilt batting
1/8 yd lightweight fusible interfacing (scraps will work too since you only need enough to cut one 4" square and one 4"x10" rectangle)

*If you want both sides to be the same fabric, you can get by with just 2 yards TOTAL as long as your fabric is 45" or wider.  Be forewarned that most quilting-weight fabric is right on the cusp of 44/45" and will likely shrink a bit if you prewash, so you may want to go ahead and purchase the full 3 yards.

Instructions:
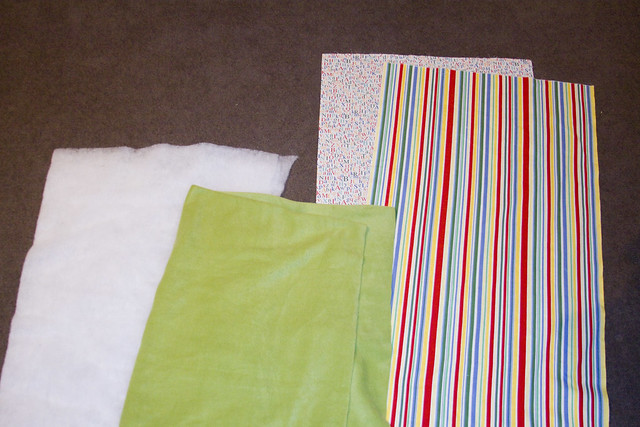
1. Cut one 22"x46" rectangle each from the top and bottom fabrics.

2. Cut a 36"x 44" rectangle from the fleece. If you like, you can finish 3 of the edges on a serger or with a overcast or blanket stitch, or you can leave them raw, like I did last time, since the fleece will not unravel.

photo

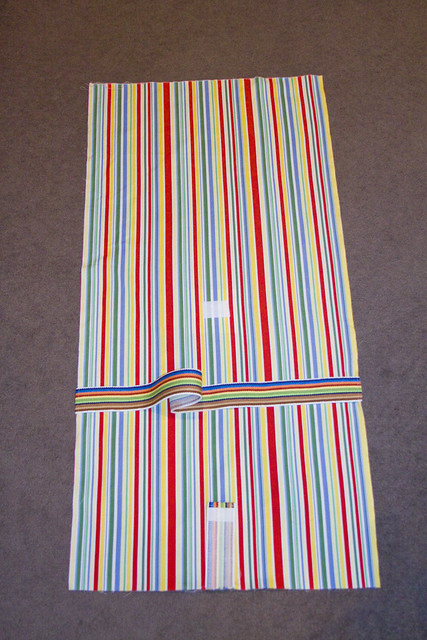
3. Cut a 4" square piece of the interfacing. Fuse to the WRONG side of the Bottom panel, 20" up from the foot/bottom (assuming your fabric orients in one direction) or short end, and 9" from either side.

4. Cut a 4"x12" rectangle of interfacing and fuse to the WRONG side of the Bottom panel, centered about 1/2" down from the top.


photo

5. On the right side of the Bottom panel, in the center of where the 4" square of interfacing is, sew a 2" piece of the female side of the velcro. I usually sew around the edges and then reinforce with an "X" through the center.

6. On the right side of the Bottom panel, along the top, sew a 9" long strip of the female side of the velcro in the center of the where the interfacing rectangle is.

7. Cut 27" of nylon webbing for the strap. If you prefer, you can make a strap out of some of the leftover top or bottom fabric: cut a 4"x27" strip. Fold lengthwise and press a crease in the center. Then open it up and fold the two long sides toward the crease in the middle and press. Fold in half again and press again. Stitch 1/8" from edge to close.  If you are using quilting-weight fabric, I recommend interfacing the strap so it stands up better to wear & tear.

8. Place one end of the strap on each side of the RIGHT side of the Bottom panel, 14" up from the foot. Baste in place with a 1/4" seam allowance, leaving a 1/2" tail hanging off either edge.

9. Cut 6" of nylon webbing for the tab. (Again, you can make a tab from fabric if you prefer by following the same directions as for the strap.) Sew a 1 1/2" piece of the male side of the velcro to one end of the webbing.

photo
10. Place the tab in the center of the RIGHT SIDE of the Bottom panel (10 1/2" from either side), velcro facing up, and pointing in towards the center of the panel. Baste in place, leaving a 1" tail hanging off the bottom edge.

11. Cut two 22"x46" rectangles out of the batting. (You can do more layers if you want the mat to be thicker, but I probably wouldn't do more than four total. Alternately, you could also purchase thicker batting by the yard instead of the pre-packaged kind.) Line up the batting on the WRONG side of the Top panel and baste in place.

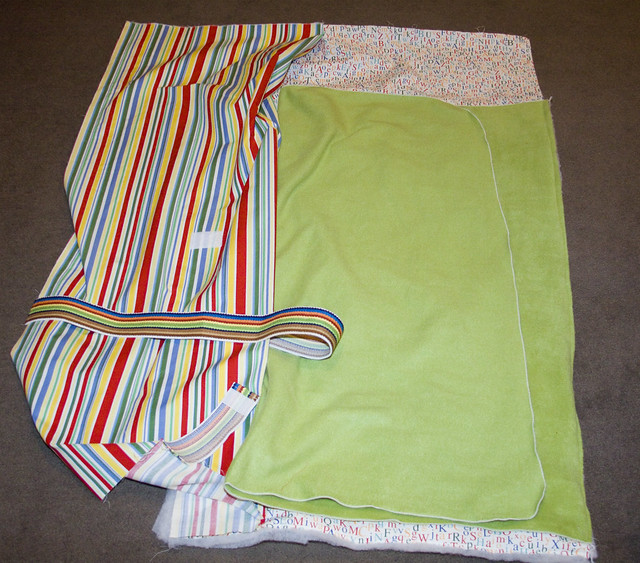
12. Flip over the Top panel so that the right side is facing UP. Line up one edge (the raw one, if you finished the edges) of the fleece blanket, along the edge of the Top panel also with the right side facing UP. Baste in place.

photo13. Note: you can skip all the basting if you like. I just think it helps keep everything in order. Just make sure that when you make a sandwich of your pieces, they are in this order:
A. Bottom panel (right side up)
B. Straps
C. Fleece blanket (right side down)
D. Top panel (right side down)
E. Batting

14. Starting 9" up from the bottom right corner, sew almost all the way around the edges of the nap mat, using a 1/2" seam allowance. Stop just after you turn the last corner, leaving a 6-8" opening on the side. Be sure to backstitch at either end.

15. Turn the entire nap mat, right sides out.  Stitch the opening on the side closed.  If you want the seam to be invisible, I recommend hand-stitching.  I'm lazy though and just ran it through my machine. ;)

16. Last, but not least, you need to make the detachable pillow. Cut an 18" x 25" rectangle out of whichever fabric you prefer. This will be the body of the pillow.

17. Next, cut an 11" x 9" rectangle out of either the same or the opposite fabric (again, whichever you prefer).  This will be the detachable velcro tab.  Fold it in half lengthwise, right sides together, so that you have a rectangle measuring 11" x 4 1/2".  Stitch along the short sides and turn the right sides out.


photo

18. With the right side facing down, place the tab you just made along one of the short sides, lining up the raw edges.  Fold the pillow fabric in half, wrong sides together, so that the short sides meet and you have a rectangle measuring 12 1/2" x 18".

19. Sew along the edges, leaving a 4" opening at one of the short ends. Turn the pillow right side out and stuff with polyfil.  Stitch opening closed either with machine or by hand. 

20. Sew a 9" strip of the male side of the velcro to the tab, about 1" up from the bottom.  You can adjust the placement if you want the pillow to be closer or farther from the body of the nap mat.


photo 

photo


Hope that helps someone out there! :)

Wednesday, September 1, 2010

Fall Sewing

"Fall" sewing is probably a bit of a misnomer considering that temperatures are still regularly in the mid-90s here in Texas.  It'll probably be close to November before we get even close to what I consider to be fall temperatures, but I digress.  It's hard to believe it's been more than 2 months since my last post.  We took a long vacation for most of July and I've been playing catch-up ever since.  I also am STILL tweaking my long-promised nap mat tutorial (my punishment for being OCD), but I promise to get it up one of these days, probably when no one will really need it anymore.  :P

In any case, I did make not one, but two nap mats this year; one for E and one for her bff.  They are actually attending the same school this year, so they'll get to spend a lot more time together. 

photo
I made the initial mistake of cutting both mats to the same dimensions as E's old one, not accounting for the fact that the kids have grown quite a bit in the last year.  Doh.   To compensate, I ended up adding a separate, detachable pillow, which I think actually worked out rather well.

photo

photo

I also had a couple commissions recently for new items, one for a friend's son, and the other for another mommy.  First up was a cheerleader costume for a woman who was looking for something more authentic-looking (and modest) than the standard "sexy cheereleader" costumes you find in most shops.  I had never made anything like this before, but I rather enjoyed the challenge. I used a pattern I picked up at Jo-Ann for pretty cheap, with very few modifications other than to add a few inches to the hemlines and some short sleeves to the shell.

photo
I wish I'd had a chance to take a picture of her trying it on.  It looks much better on than it does laying on my floor.  I love that style of pleated skirt and I'm thinking about making a miniature version for E now.

Next up is my first boys' clothing item and first button-down shirt.  I absolutely adore this airplane fabric, so I was super excited when a friend of mine requested I make her son a shirt out of it.

photo

Sewing the collar on took me forever to get right, as the pattern directions were horrendous, but after my friend, Jacki, pointed me toward this tutorial with a video, I finally figured it out. 

After all that, I decided to sew something just for fun.  I settled on a simple little tunic/dress out of a Japanese sewing book (Pochee Natural and Layered Style) that my cousin picked up for me in Japantown.  It's pretty much just a front, a back, and an elasticized pocket, with pintucks and binding. Except for having to make the binding, it was a pretty quick little project. I think it turned out super cute!

photo

I had a pretty large scrap of fabric leftover after making this, so I decided to make one for E's baby doll too.  I scaled down the pattern pretty much just by eyeballing it, so it's not quite right (too big around the neck), but I don't think she'll complain. ;)

photo 

Here they are together, hee!  In the book, it's worn as a tunic, layered over a sleeved top and some leggings, but E wore it as a short dress.

photo

Tuesday, June 22, 2010

Me, Myself and I

Since I started sewing a little over 3 years ago, I have rarely, if ever, made anything for myself.  I've made tons of clothes for E and her little friends, but for some reason, I've always been too intimidated to make clothes for myself.  It's actually a bit silly when you think about it.  I'm not a petite woman by any stretch, and I have a difficult time finding clothes that fit me properly, especially across my bust, so you would think that the first thing I'd make would be my own clothes!  I finally decided that it was about time I got over this particular hangup and set out to make myself a summer wardrobe.

I started out with some simple A-line skirts.  Using the guidelines from Sew What! Skirts (a fabulous resource - I highly recommend it), I drafted a simple pattern and made 2 skirts with side zippers.  The first one is a bottomweight cotton print.

IMG_1905 by you.

[I normally despise posting pictures of myself, but I realized that it's hard to get a sense of how these items look unless they are on, so bear with me and excuse the filthy bathroom mirror. :p]

IMG_1816 by you.

Have I mentioned that this was also my first time putting a zipper in a garment?  It was way easier that I expected!  I don't know what I've been waiting for.  The second one is similar, but not quite done yet, so I'll post it when I get around to finishing it up.
 
It's impossible to get through a Texas summer without spending a lot of time at the pool or sprayground (for all you Northerners, it's basically a park or playground with water features for the kids to play in).  And even with a generous coat of sunblock, it's hard to keep from getting burned.  So inspired by a caftan my friend Valerie picked up while in Miami, I decided to try and make my own caftan-style swim cover-up.  It's basically a giant rectangle of printed cotton gauze that I sewed into an oversize "T" shape and then added a casing and ribbon drawstring.  I rolled all the edges too, mostly out of laziness. ;)


IMG_1904 by you.  

I do wish that the shape of it was a little more flattering on my body, but it serves its purpose well.  The bonus of using gauze is that it's super lightweight, so even if it gets wet, it dries very quickly.

IMG_1820 by you. 

Last, but not least, I made my very first top!  It's Kwik Sew 3610, in case you're wondering.  I always used to see tops like this in the store, but could never find one that fit me properly, particularly over the bustline. 

IMG_1908 by you.

IMG_1910 by you. 

This was also my first time working with this kind of shiny, silky fabric, and I have to say, I did not enjoy that part at all.  It was extremely difficult to keep lined up while sewing (even with a billion pins), and it also did not hold pressed creases very well, if at all.  The pattern was otherwise super easy to make though, and I think I may try it again with a super lightweight cotton woven or knit instead.

Monday, June 21, 2010

Shirring mania

I know a lot of people hate shirring, but I've always loved it.  It feels sort of like magic to take a boring old tube of fabric, sew a bunch of lines through it, and voila! It's a dress!  I've made a decent number of shirred dresses at this point, but I recently discovered something that I've never seen mentioned before: all elastic thread is not created equal.  I had previously always bought the same kind of elastic thread at the same store, but last time I was there, they were no longer carrying it.  They had Guterman elastic thread, but a friend had warned me that the Guterman didn't work very well.  So instead I bought a different kind somewhere else. 

Well, the other day, I finally ran out of the spool I was using (I'm not 100% sure what kind it was since I threw away the packaging long ago) and went to wind a new bobbin from the new package only to realize that this elastic thread looked and felt totally different.  Not only was it not as stretchy, it was also much thinner.  This did not bode well. 

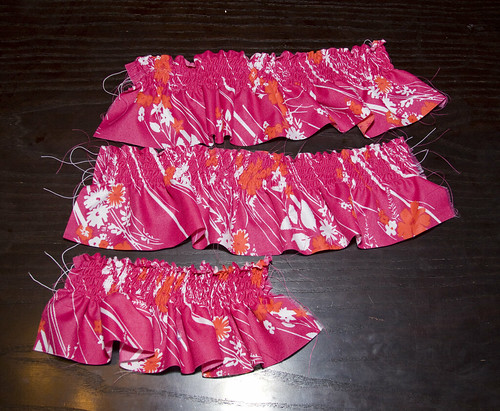
Rather than risk messing up a dress I was only halfway done with, I decided to go and hunt for different thread.  I came back with two more spools from two different stores and did test runs of all three on 5" x 25" strips of lightweight woven fabric (same as the dress I'm currently making).  I hand-wound a bobbin with each of the three different kinds of thread and then shirred 5 rows on each strip; tension: 6, stitch length: 4, each row approximately 3/8" apart.

IMG_1915 by you.
Strip #1 (Top)
Designer's Choice Elastic Sewing Thread
bought at Hancock Fabrics
64% Polyester, 36% Rubber
Finished length: 13"
After steaming: 9 1/2"

Strip #2 (Middle)
Dritz Elastic Thread
bought at Jo-Ann Fabrics
28% Polyester 72% Rubber
Finished length: 15"
After steaming: 11" 

Strip #3 (Bottom)
Stretchrite Elastic Sewing Thread
bought at Hobby Lobby
42% Polyester, 58% Rubber
Finished length: 9"
After steaming: 8" 


As it turns out, the brand and/or rubber content makes a huge difference!  The Designer's Choice was the the thinnest and felt the least stretchy, so I was surprised to see that it actually shirred up tighter than the Dritz, which had the highest rubber content.  The Stretchrite was far and away the most effective, and I suspect that it's what I had previously.  I'll also note that it was the cheapest, although I think that Hobby Lobby's notions are generally cheaper than Hancock and Jo-Ann.  Each spool has 30 yards, so one usually goes pretty far.  I don't think I've had to buy more than one a year.  Even so, I think next time I'm there, I may stock up, just in case.

Oh, and just for kicks, I also tried machine-winding bobbins for the Dritz and Designer's Choice threads and sewing 5 rows on shorter strips of fabric.  I was hoping that the tighter, more uniform wind would make them gather more when sewn.  I was shocked and disappointed to see that they both actually seemed to perform slightly worse.  So I guess I'm stuck with hand-winding.  Bah.

[Edited to add:
I forgot to see how much more these would shrink up after applying some steam to them from the iron.  Each strip did gather up a bit more and I've added it to the stats above. (Thanks, Jacki, for reminding me!)]

Olivia dresses

A friend requested that I make a dress out of Olivia fabric for her daughter.  She originally requested a simple A-line dress with criss-cross straps, so I loosely traced one of E's dresses to make a simple little pattern and then sewed a couple tubes to make the straps.  I rolled the bottom hem on my serger to keep as much of the length as possible.  I originally left the straps un-tacked down in the back so that I could customize them to the right length, but then we decided to leave them that way and make it into a halter dress.

IMG_1856 by you. 

IMG_1892 by you.

IMG_1893 by you.

Of course, once E saw her friend's dress, she insisted that I make a matching one for her too.  I made the top band a bit bigger to try and get more length out of it for my tall girl, but I realize now I should have adjusted the width too. 
Here's the promised pic (excuse the weird face, she was not being very cooperative).

IMG_1914 by you.

Thursday, June 10, 2010

Summertime and the living is...busy!

Ack!  How is it that it's been more than a month since my last post?  Well, needless to say, I've been busy both with life in general, and with crafting. 

First up is a whole mess o' crayon rolls.  Most of these were ordered by friends, but then I decided that while I was at it, I may as well to make extra to keep on hand.  I won't bore you with pics of every single one, just the cute ones. ;)


IMG_1784 by you. 


IMG_1782 by you. 


IMG_1780 by you.


Next is yes, you guessed it, another apron!  I have to say, I thought I'd get really sick of these, but I haven't.  I just love seeing how the different fabric combos turn out.  I think the embroidery on this one really makes it pop too.
IMG_1843 by you.


Hm, what else....Oh for teacher appreciation week, I took a page out of my friend Nicole's blog and made up some therapy sacks for E's preschool teachers.  I used wheat berries scented with a little lavender oil and tied them up with a little ribbon and the same poem that Nicole used.  I have to say, I was a bit shocked at how much wheat I needed.  I bought 5 lbs and and used all of it to make these three sacks!  Yikes!  But I must say, these were very quick little gifties and I will definitely be making more in the future, especially around Christmastime.


IMG_1656 by you. 


Oh and for the first time ever, I've also been making some stuff for myself!  :) I'll save that for a separate post though.  More to come...

LinkWithin

Blog Widget by LinkWithin