Thursday, February 25, 2010

Beach dress

IMG_0706 by you.


My best friend was in town for a visit last weekend, and I took her with me to a local fabric outlet, Golden D'or.  I'm a bit of a cheapskate, and it's one of my favorite places to browse for bargains.  Oh and also to pick up dirt-cheap notions like elastic, velcro and zippers.  She found this very pretty thin cotton fabric on the clearance table and asked me to make a shirred beach dress/swim coverup for her to wear this summer. 

This fabric seemed a bit dingy and flimsy under the fluorescent lighting in the store, but I must say, it looked much prettier after we got it home.  It also washed up beautifully soft, and I think the thinness will be perfect for a hot day at the beach.

It's been a while since I've done a shirred dress, and this was my first attempt at an adult-sized one.  It's hard to tell from the pic, but it's about knee length, maybe a little bit longer.  I've definitely come a long way though since the very first one I made for E, almost 2 years ago!  Thanks to my serger, I did rolled hems with wooly nylon on the top and bottom.  I love the contrast of the white against the hot pink.  Then I just did a quick serged seam to make it a tube and started shirring away!  It goes so much faster when you have someone else to wind the elastic on the bobbins for you. ;)

I love how this turned out, so much so that I may go back and buy some of the same fabric in blue for myself.  I'm dropping it in the mail today and hoping my friend will take a pic of herself wearing the dress and let me post it. *hint hint*

Wednesday, February 24, 2010

Aprons!

March is the month of birthdays in our house: my daughter, my mother-in-law, my best friend and myself!  Plus a ton of E's little friends have birthdays this time of year too.  I guess that's what I get for befriending people with kids so close in age to my own kiddo!  I usually try to stock up on gifts throughout the year so that I'm not making a mad scramble at the last minute, but lately I've been really into homemade gifts.  Not that it necessarily saves me money, but it gives me an excuse to buy fabric and work on new projects. ;)

I decided to make an apron for one special little girl who is currently into cooking.  I decided to draft my own pattern and make it reversible, partly because I like having all the strap ends hidden, but also because I hate having to make and sew binding.  Store-bought never comes in the right colors and it's never on sale!
I thought it'd be a nice touch to have her name embroidered on it, so I called on my friend Chrystyna of Kenzie Kouture.  We ended up doing a little bit of an exchange, as she needed an apron as a gift for one of her daughter's friends as well.  I really love how the embroidery looks.  I think it really adds a special touch to a gift.  In fact, I'm starting to get spoiled by the convenience of knowing someone who can do custom embroidery!

Here are the finished aprons.
IMG_0681 by you. 
I loved using coordinating fabric for the backside, instead of just plain solid.
IMG_0680 by you.

And here is a close-up of the embroidery on one.  Chrystyna suggested using blue for the lettering and I think it pops really nicely.
IMG_0672 by you. 

With the right fabrics, I think these would make good boy gifts too.  I'm also thinking it might be cute to do one with a more plain fabric and some kind of applique, like an initial or even an animal face. 

All-in-all, I'm very pleased with how these turned out, on the first try no less, and I will probably be adding them to my Etsy shop at some point in the near future.   If you're interested in ordering one, email me at craftyasiangirl@gmail.com. :)

Monday, February 15, 2010

Serge-a-licious!

IMG_0576 by you.

Yesterday, with the aid of my handy new serger, I managed to whip up this little hoodie in just a couple hours!  It's the raglan tee pattern from Kwik Sew for Toddlers, an awesome pattern book that my brilliant friend, Jacki, turned me on to (it's also mentioned in this post).  If you're interested in learning to make clothes for your kid, I highly recommend it.  Don't be scared off by the horrifyingly dated outifts on the cover.  It's got very solid, basic garments that are easily adapted to your own style.

For this shirt, I traced and cut the raglan tee/sweatshirt pattern in 3T.  I didn't want to do cuffs or a waistband and my daughter has a long torso, so I lengthened the sleeves and bottom hem by a bit.  I also added a hood, partly because she is obsessed with hoodies, and also so I wouldn't have to make a neckband. ;)  For the hems, I serged the edges, turned them other and then top-stitched with a twin needle.  Easy peasy!

As you can see, she loved it and wanted to wear it immediately. 
IMG_0570 by you.

It's a bit boxy, so I may try making it a bit more fitted next time. I may even go down a size in the body and adjust the hem & sleeves accordingly.  I think the sleeves here are a little bit short, so I may end up adding a cuff there after all.  Also, the hood isn't nearly deep enough, so I'll definitely lengthen that next time too.  Not bad for a first try though! And it was way easier to make than I anticipated, so much so that I'm kicking myself for not trying it sooner!  I'll definitely be making more of these in the near future - next up is a zipped hoodie sweatshirt.  Then maybe some short-sleeved hoodies for spring, maybe even a dress or two.  Hoodie-mania!

Thursday, February 11, 2010

Valentine's outfit

IMG_0452 by you.

About a month ago, I bought some heart-themed Hello Kitty fabric with the idea of making E a special Valentine's outfit.  I had originally planned on a pillowcase dress or the like, but when I saw my friend, Chrystyna of Kenzie Kouture, making these adorable embroidered heart shirts for Valentine's Day, I couldn't resist ordering one for E.  Instead of a dress, I made a tiered ruffle skirt to match.  I absolutely love how this turned out!

This was also a great opportunity to use my new serger! I know, you're thinking "wait a second, didn't you already have a serger?"  Well, long story short, I sold the old serger because I never used it (and it sort of scared the crap out of me).  Then I realized I desperately needed one for the Great Ruffle Project, so I ended up getting a new one.  Thanks to some hand-holding by now I'm totally over my serger fear and LOVING it!

I was especially excited to try out a rolled hem with wooly nylon, although I had a bit of trouble with it and the bottom tier ended up being a bit shorter than I intended, especially on one side.  Oops.  I had originally intended to use the serger to gather the tiers too, but it didn't quite work out the way I wanted, so I ended up using the ruffler foot on my regular sewing machine instead.  I have to say, I absolutely love that thing!  It made sewing this skirt so quick & easy, and I ended up with pretty much perfect gathers for each tier.  I'm definitely going to make more of these in the future.

Here's a shot of just the skirt.
IMG_0442 by you.

I usually put some kind of ribbon tag in the waistband to distinguish the front from the back. I couldn't resist using some Hello Kitty ribbon that my cousin gave me.
IMG_0443 by you.

My love for HK has definitely rubbed off on my daughter.  E was very excited to wear this outfit to her school Valentine party today!  She also wore Hello Kitty socks and rain boots - she's very into matching too, haha!
IMG_0454 by you.

I ended up whipping up another skirt or one of E's little friends too.  I'm thinking that with spring around the corner, snow notwithstanding, I may start selling these!
IMG_0484 by you.

The Great Ruffle Project of '10

IMG_0441 by you.


About a month ago, a friend of mine asked me to make some costumes for a high school musical she's directing.  Specifically, she wanted seven tango-style skirts.  I rarely work from patterns, but I am generally good at picturing how I want things to turn out, so I agreed to give it a shot, even though I've never made anything like that in my life.  Little did I know that I would end up knee-deep in ruffles!

Basically, I wanted to make a wrap-style skirt that has a high slit up one leg, and then I attach layers of ruffles to the skirt.  In my head, this all sounded very simple and straightforward.  So off to the fabric store we went, where we picked out a bunch of glittery satin-y fabric in four different colors, as well as a drapey black jersey for the skirt bases.  I think in total, I ended up taking home about 20 yards of fabric, easily the most I've ever bought in one go, for one project!

My original plan was to cut long, 7" wide, single strips for each row, and then to gather those strips. But after spreading out 4 and 5-yard swaths of fabric across my floor, I realized that not only would it be exceedingly difficult to cut a 4-yard long straight line, it would also be a tremendous pain to pull & gather that much fabric.  Instead, I cut strips across the width of the fabric, which was just shy of 60 inches.  I probably should have seamed the pieces together, but in order to save time, I opted to slightly overlap them when I sewed them on.  I think the overlaps are barely noticeable.
IMG_0197 by you.

The other thing I failed to think through was just how long it would take me to make all these ruffles.  I did the math at one point, and I think it came out to around 100 yards worth of fabric strips that needed to be gathered!  Can you believe I thought I'd be able to do this by sewing basting stitches and then pulling and gathering hand?  That insane delusion lasted long enough for me to make one very pathetic-looking ruffle before I started searching for other ideas. 

Lucky for me, I have lots of very clever sewing friends, one of whom suggested a ruffle foot, and another of whom was extremely kind and generous enough to loan her ruffler to me.  Can I just say, that ruffler saved my freaking life?! 

Here's a pic of the ruffler foot.  It looks like a totally insane and intimidating contraption.  There are a number of moving parts, as well as various knobs and dials that need to be adjusted, so there is a bit of a learning curve to overcome.  But once you've got it set up properly, it makes the most beautiful, evenly spaced gathers!  I loved it so much that despite being rather pricey, I went out and bought one for myself!  One word of warning though, because it does move and shake so much, I noticed that after a while, some of the knobs tended to come loose, particularly the big one that holds the foot onto the shank of my machine.  So if you're going to be using this for big projects, make sure you frequently give everything a quick twist to tighten.

Once I had all the ruffles done, it was a simple matter of attaching them to the skirt bases, turning down the top to make a simple waistband, and then adding velcro closures.  Although when I say simple matter, I should mention that it still involved hours of careful pinning, haha.  And there was also the not-small issue of having to finish the edges of the satin, which unravels like crazy.

IMG_0447 by you.
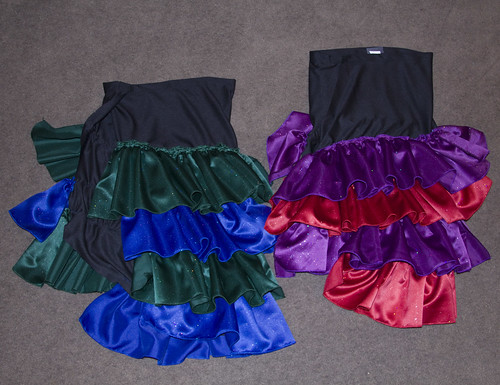
In any case, here are two of the finished skirts.  I ended up doing 4 in green/blue and 3 in red/purple.

It's very difficult to get a sense of how these really look when they're just laid out on the floor, so here is a picture of the back one skirt pinned around a pillow. Basically, the ruffles start just below the buttocks, and the slit goes almost all the way up the thigh.  The hemline is tapered a bit, so they are longer on one side.  My understanding is that the girls are going to be wearing these with black leotards, black tights and maybe black booty shorts too.  I'm hoping to be able to get a picture of them in action at some point.

Wednesday, February 10, 2010

A bunch of FO's - and more on the way!

Yes, I've been MIA.  No, I have not been slacking off.  In fact, I've been so busy that I haven't even had time to post!

I've been doing some major cleaning and reorganization of my craft room, which included the purging of stuff I know I was never going to get around to using, as well as finishing up a few old projects that have been hanging around.  I've also been working on the biggest sewing project of my entire life (yes, bigger even than the Christmas quilt), which has consumed pretty much all my free time these last few weeks.  I'll have to save the details for a separate post.

First up, a granny-square afghan.  I originally started this as a gift for someone about 7 years ago.  I love the pattern for this square, but it was extraordinarily time consuming because of all the color changes. I got about 1/4 of the way done and realized it was going to take me a million years to make it as big as I wanted, so I abandoned ship and did a different, faster (one-piece) design.  Which left me with roughly 1/4 an afghan that then sat in storage, forgotten.  Fast forward to a couple weeks ago, when I found the squares in a bin and thought to myself, I may as well stitch these together and see what I can do with it.  I think it'll make a nice little lap blanket.  Or maybe baby/toddler afghan.  Still not sure what I'm going to do with it.  I thought about trying to sell it, but I'll probably gift it to someone instead.

IMG_0449 by you.


Then here's another hat that I actually finished a while back but just never got a chance to post.  It was a commission by a friend for her son, who wanted a football hat.  I had to come up with the fair isle football design myself, and I'll confess, I'm not 100% happy with it.  But I'm also not sure how I could have improved the shape of it.  I do otherwise love it though, especially the yarn I used, which was a wonderfully soft & yummy wool/bamboo blend.

IMG_12607 by you.


I have two more finished hats too, but I keep forgetting to take pictures of them. One is a hat I started last month as a gift for a friend's daughter.  It has a fair isle heart design all around it, which I adapted from a pattern book.  I love the hearts, but unfortunately, it turned way too big, so now it's probably going to end up as a hat for E.  Or I may put it away and sell or gift it next winter.

The other one is a hat I made for E.  After seeing the owl hat I made for a friend's son, E requested one of her own.  Knowing how rough she is on her things these days, I opted against using the same wool/cashmere blend yarn and instead picked up some Lion Brand Thick & Chunky Wool-ease.  It turned out a teeny bit bigger than the original, but she seems to be ok with it.  I still need to sew on the face, which I've been rather lazy about.  I'll try to get pics up soon.

Edit: here's the heart hat!
IMG_0579 by you.

LinkWithin

Blog Widget by LinkWithin