
I know a lot of people hate shirring, but I've always loved it. It feels sort of like magic to take a boring old tube of fabric, sew a bunch of lines through it, and voila! It's a dress! I've made a decent number of shirred dresses at this point, but I recently discovered something that I've never seen mentioned before: all elastic thread is not created equal. I had previously always bought the same kind of elastic thread at the same store, but last time I was there, they were no longer carrying it. They had Guterman elastic thread, but a friend had warned me that the Guterman didn't work very well. So instead I bought a different kind somewhere else.
Well, the other day, I finally ran out of the spool I was using (I'm not 100% sure what kind it was since I threw away the packaging long ago) and went to wind a new bobbin from the new package only to realize that this elastic thread looked and felt totally different. Not only was it not as stretchy, it was also much thinner. This did not bode well.
Rather than risk messing up a dress I was only halfway done with, I decided to go and hunt for different thread. I came back with two more spools from two different stores and did test runs of all three on 5" x 25" strips of lightweight woven fabric (same as the dress I'm currently making). I hand-wound a bobbin with each of the three different kinds of thread and then shirred 5 rows on each strip; tension: 6, stitch length: 4, each row approximately 3/8" apart.
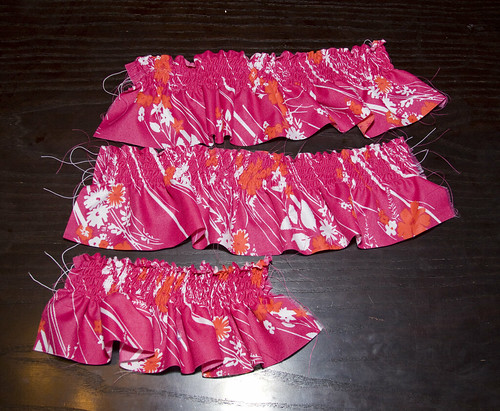
Strip #1 (Top)
Designer's Choice Elastic Sewing Thread
bought at Hancock Fabrics
64% Polyester, 36% Rubber
Finished length: 13"
After steaming: 9 1/2"
After steaming: 9 1/2"
Strip #2 (Middle)
Dritz Elastic Thread
bought at Jo-Ann Fabrics
28% Polyester 72% Rubber
Finished length: 15"
After steaming: 11"
After steaming: 11"
Strip #3 (Bottom)
Stretchrite Elastic Sewing Thread
bought at Hobby Lobby
42% Polyester, 58% Rubber
Finished length: 9"
After steaming: 8"
After steaming: 8"
As it turns out, the brand and/or rubber content makes a huge difference! The Designer's Choice was the the thinnest and felt the least stretchy, so I was surprised to see that it actually shirred up tighter than the Dritz, which had the highest rubber content. The Stretchrite was far and away the most effective, and I suspect that it's what I had previously. I'll also note that it was the cheapest, although I think that Hobby Lobby's notions are generally cheaper than Hancock and Jo-Ann. Each spool has 30 yards, so one usually goes pretty far. I don't think I've had to buy more than one a year. Even so, I think next time I'm there, I may stock up, just in case.
Oh, and just for kicks, I also tried machine-winding bobbins for the Dritz and Designer's Choice threads and sewing 5 rows on shorter strips of fabric. I was hoping that the tighter, more uniform wind would make them gather more when sewn. I was shocked and disappointed to see that they both actually seemed to perform slightly worse. So I guess I'm stuck with hand-winding. Bah.
[Edited to add:
I forgot to see how much more these would shrink up after applying some steam to them from the iron. Each strip did gather up a bit more and I've added it to the stats above. (Thanks, Jacki, for reminding me!)]
[Edited to add:
I forgot to see how much more these would shrink up after applying some steam to them from the iron. Each strip did gather up a bit more and I've added it to the stats above. (Thanks, Jacki, for reminding me!)]


