Showing posts with label baby. Show all posts

Monday, January 17, 2011

Burn out

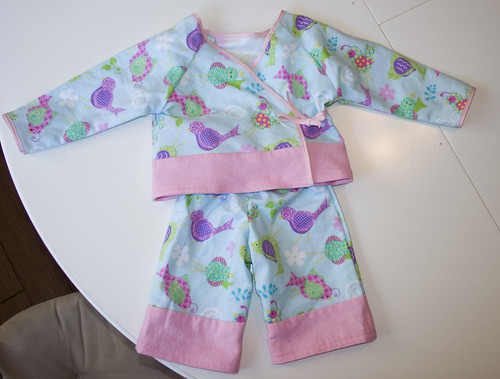
I think Halloween totally burned me out on crafting, and maybe blogging too.  It's been forever since I've posted, but believe it or not, I have still been making stuff.  Just been too lazy to edit and upload pics so I could blog.  Plus we were out of town for long stretches over both Thanksgiving AND Christmas/New Year's...and well, you get the picture.  Enough with the excuses, on to the crafts!

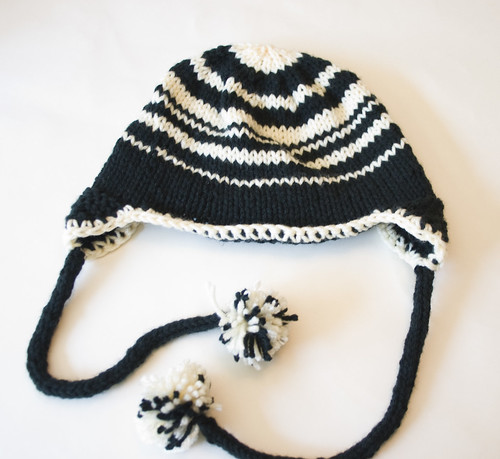
Like I mentioned, I haven't been totally idle, but I did take a long break from sewing after making all those costumes.  Instead, I decided to get back into knitting.  A little lower stress, and bonus points for being able to do it on the couch, in front of the TV. ;)  First up, a newborn hat that I made for a friend's new baby boy.  Photo by bernadette uzcategui photography.


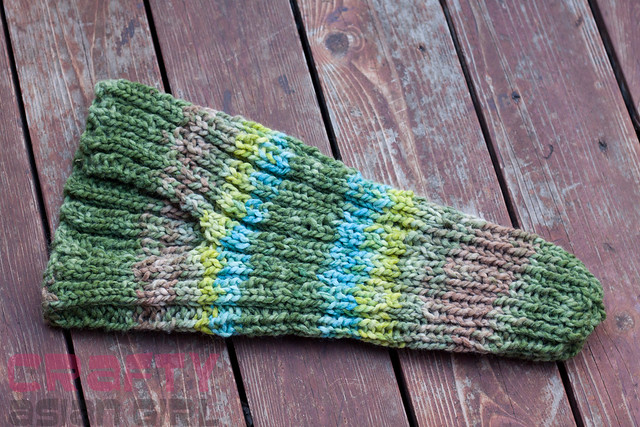
 The baby's father loved the hat so much that he requested a matching hat of his own, hee.  So not only did I make one for him, but I also made a headband/headwarmer in the same colorways for the mom.

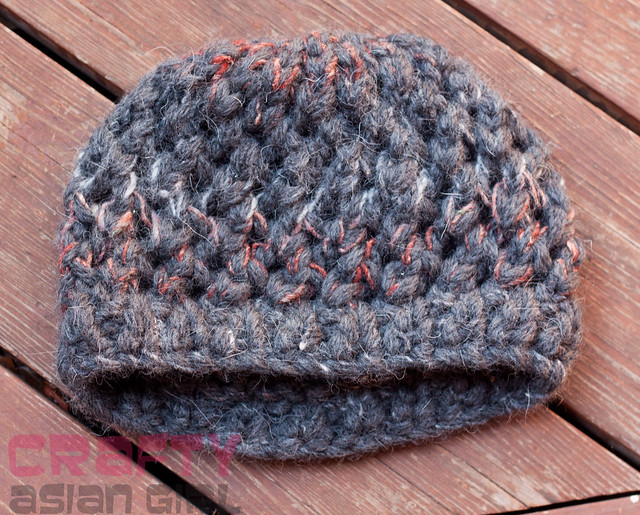
Next up, a hat for myself!  I took a quick trip to Philadelphia one weekend to visit a friend, and we went to one of my favorite yarn stores there, Nangellini. The owner, Nancy, is so wonderfully friendly (and she even remembered me from my last visit, a year ago!), I highly recommend checking it out if you're ever in the area.  I couldn't resist this yummy Ushya wool yarn and knit up a 'holey' hat, stranded with some Noro yarn for texture.

photo


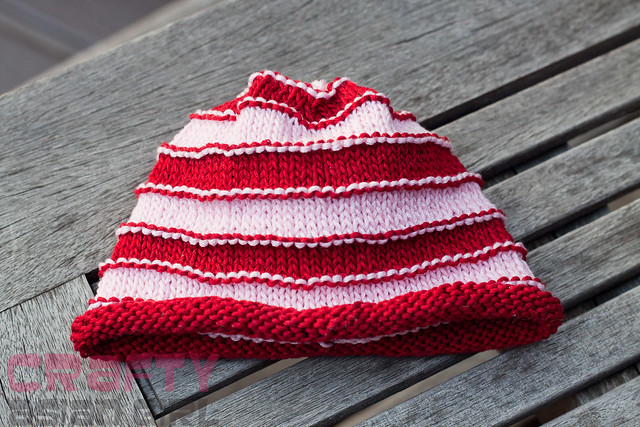
Of course, I also had to make a newborn hat for my new niece!  I love that this sort of looks like a candy cane.

photo 

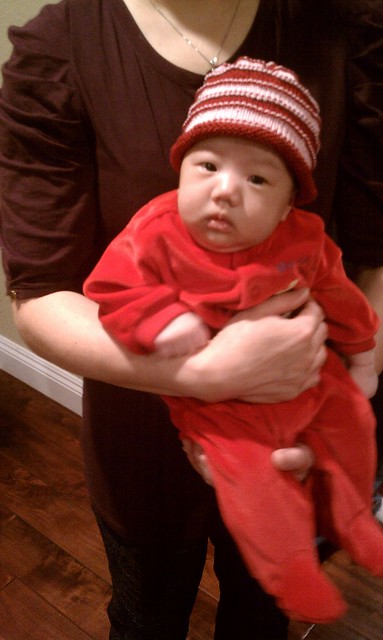
And here she is modeling it at Thanksgiving.  :)  Forgive the blur, this was hastily snapped with my phone.
photo
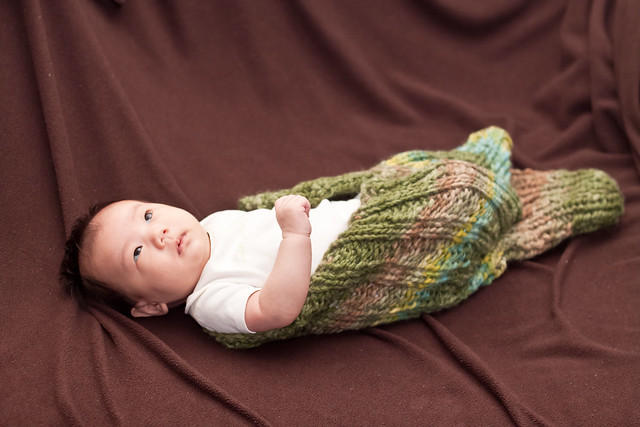
I also knit up a cocoon to take pictures of her in, but sadly, she was already too big (and active) for it.
photo 


photo

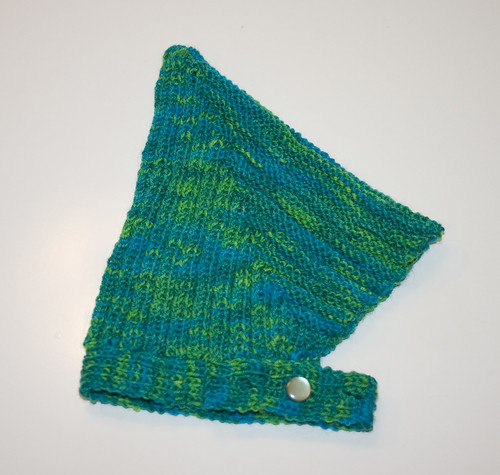
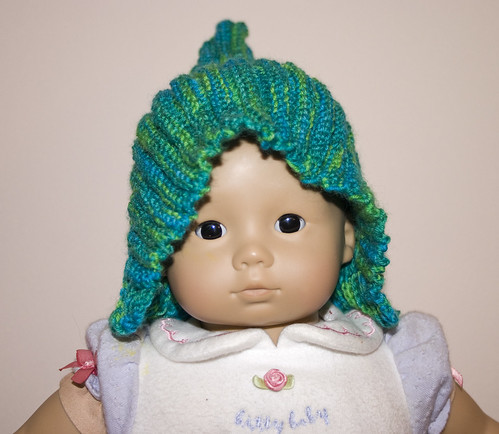
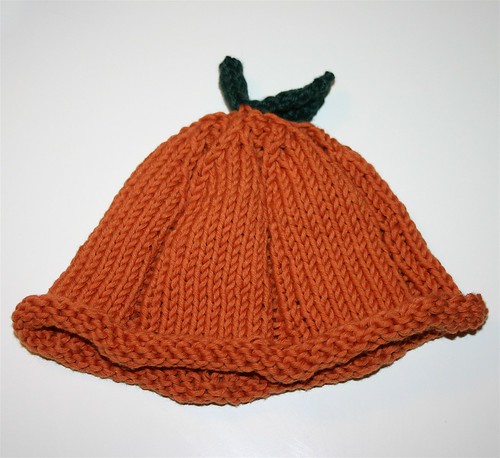
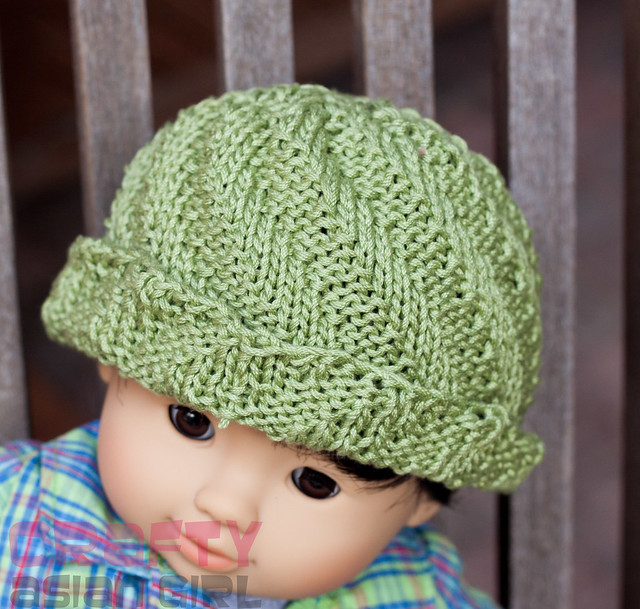
Another baby hat. This time I experimented with a sort of twisted rib pattern. 
photo 

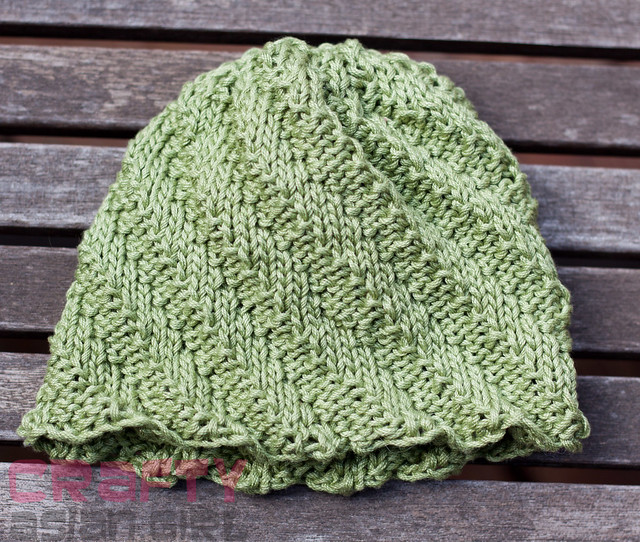
I'm not sure if I like how it turned out; I think it sort of looks like a head of lettuce, lol.  It looks slightly better when the bottom edge is turned up a bit.  Apologies for the creepy doll-model.  I don't have quick access to any tiny babies these days. 
photo 
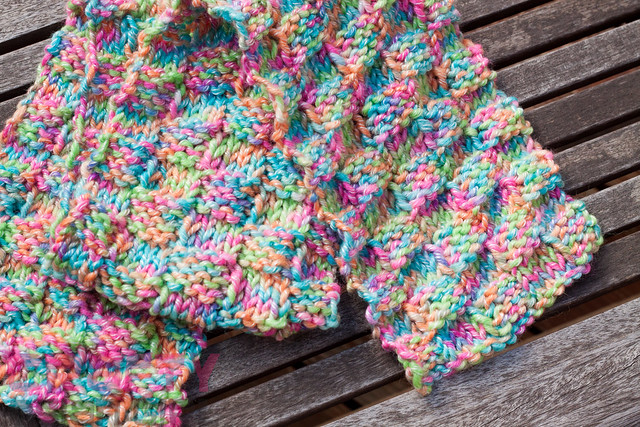
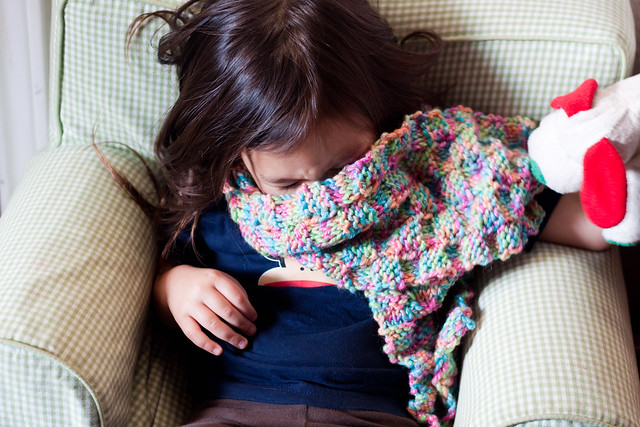
Since the weather has finally gotten colder, I also knit up a quickie scarf for E.  She picked the yarn herself. I tried to hold back my gag reflex. I used a basic basketweave pattern, K4, P4 for 4 rows and then switch.

photo 
She got all goofy and uncooperative when I asked her to actually model the darn thing.  Ah, 3-year-olds.

photo

Next up, holiday crafting! :D

Saturday, October 2, 2010

Baby stuff

I miss having a little baby to sew for.  Although to be technical, I only started sewing after E was born and I didn't really tackle clothing or anything big until she was well into the toddler stage.  So I get really excited when I have an excuse to sew for little ones.  In the last year or so, there's been a bit of a baby boom amongst my friends, so I've been doing my best to sew little gifties when I've had time.  

First up is a cute owl jumper for a good friend's daughter's first birthday!  This is the same friend that I threw the birdie baby shower for, so when I saw this owl corduroy at Jo-Ann, I knew she would love it.  It's from an Ottobre pattern.

photo 

Here it is, on the birthday girl.  A little big, but still super cute. 

photo


Next up is a baby shower gift for another friend who is due at the end of October.  I've been meaning to try out the Itty Bitty Baby Dress pattern from Made by Rae, and this was the perfect opportunity.  My friend's older daughter also recently had a birthday, so I also used the enlarged pattern to make a matching dress for a belated birthday gift for her!

photo 

These were really fun and easy to make.  I can see myself making a bunch more, especially since I have a baby niece arriving soon!  The smallest size of the newborn dress also fits E's doll rather nicely, so I'll probably be making one for her as well. ;)

Last, but not least, is a shopping cart cover that a friend commissioned for her little boy.  I'd never made one before, so this was a bit of a challenge, which I love.  I tried looking at some ready-made patterns, but most were fussier and/or more complicated than what I wanted, so in the end, I came up with my own, which was pretty much just a large rectangle with elastic and holes.

photo 

I used quilting cotton for the top and a bottomweight cotton twill for the bottom so that it would hold up to wear & tear.  I used two layers of batting, plus a layer of fleece for the padding, then I layered everything and serged the edges all together.  I turned down about 4" on the front and back to create pockets to hold it in place.  I added elastic to the front pocket to make it a bit more snug around the cart handle, but left the back as is.  I used bias tape to cover the raw edges on the sides, as well as the leg hole in the middle, and I made large buttonholes and threaded them with nylon webbing for the safety belt.

I do wish that the elastic I used had cinched the front part up a bit tighter, but other than that I think it turned out rather well.  I also ended up whipping up a quickie storage bag from some of the leftover twill.

photo

Sunday, November 1, 2009

A few FOs...

For once in my life, the lack of posts here has not meant I've been slacking! Just so busy working on so many various things that I haven't had time to finish enough to post.

Here's the lone Halloween-related item I made this year:
IMG_11755 by you.

Sadly, it's not the costume, but the striped goody bag.

I opted not to make E's costume this year. She is notoriously moody when it comes to wearing the things I make her, and I knew that if I spent a lot of time sewing her a costume only to have her refuse to wear it, I would be crushed/furious. So instead, I bought her this simple, but cute bee costume from Old Navy. It was basically a fleece vest with wings and antenna on the hood, so not only would it be easy to get on and off, it would also be highly adaptable to any variations in weather.

True to form, as soon as I showed her the costume and asked her to try it on, she refused. This continued until literally minutes before the party we attended. I actually whipped this bag up the morning of the party after being hit by a wave of guilt that I hadn't made her costume. It's about as simple as it gets: yellow felt stripes appliqued onto black felt, then folded and sewn down two sides to make a bag. I did flatten the bottom into a gusset of sorts, but that's about as fancy as it got. I thought it made a pretty cute accompaniment to her costume, and it was WAY cheaper than the $12 Pottery Barn Kids version (although I'll concede that the PBK one is a lot cuter). If I'd had a little more time and energy, I probably would have found a way to add some wings, but oh well.

IMG_11825 by you.

My other major accomplishment this week was finishing the Stella Pixie baby hat that a friend had commissioned for her newborn baby. I absolutely adore the Cascade Heritage yarn that I used to make it, and I'm more than a little excited that I have enough leftover to make something for E too.
IMG_11805 by you.

A couple minor warnings for anyone else making this: first of all, even knitted to gauge, it's big. Since this was for a newborn, I made this a full size smaller than the pattern originally called for and cast-on 8 sts less than the smallest size they had listed. I read this same complaint on a few other blogs, but of course, not until after I'd already started mine.

The other complaint is that the pattern I linked to on Etsy's Storque blog has an error in it (the buttonhole section towards the end), so I would recommend downloading the PDF link they have instead, which comes from the publisher. I struggled for a while with the buttonhole part, which it made no sense, before finally giving up and doing a different kind.

Here's a pic of it on one of E's dolls. It's missing the bottom strap portion, but you get a better idea of the pixie shape when it's on a head.
IMG_11803 by you.

Last, and sort of least, there's this random stripey hat that I've been working on here and there for the last few weeks. I started it mostly to use up a few odds and ends that I had laying around, but I also wanted to try out an idea I'd seen where you knit the earflaps first and then incorporate them into the hat round. I hate picking up stitches almost as much as I hate seaming, and this was a nice compromise. This was also a nice chance for me to practice my "jogless jog" striping.

My original intention was to make a hat for E. Well, of course, it ended up HUGE so now I think it's going to be a hat for me, haha.
IMG_11807 by you.

Monday, September 28, 2009

Birdie kimono set

IMG_11350 by you.

I'm ashamed to admit, I have had this outfit 75% done for the last 2 months, only to get stuck on the binding and put it aside in frustration. Well, the pregnant friend that this was for had her baby last week, which lit a fire under my behind to get it done.

It's the Kimono PJ Set from Amy Butler's Little Stitches for Little Ones book, generously loaned to me by the above no-longer-pregnant friend. I had the bright idea to do it in flannel instead of cotton, thinking it'd be cozier. This actually worked out fine for the most part, except for the binding, which I foolishly also tried to do in flannel. Here's a tip for anyone trying to make tiny flannel bias tape: don't do it. Trying to get 1/2" flannel single-fold binding to hold a sharp crease was next to impossible. And then folding it over and pinning the now 1/4" on each side? Infuriating.

So instead, I went and bought some double-fold bias tape from the store and sewed it on the "wrong" way (meaning, I just jammed the raw edges into the fold instead of opening it up, sewing along the crease, then folding and sewing again). I also opted to put binding along the cuffs of the sleeves too. I think it added a nice finished-looking touch.

IMG_11346 by you.


Like other Amy Butler patterns I've tried, this was not a difficult project, but there were a lot of steps and the directions can be confusing at times. I think I read them about 20 times before I started, just to be safe. My main complaint though is that the pattern instructions were a bit lacking in common sense.

First off, folding 1/2" hems on the bottom of the pants and the bottom of the kimono top looks totally absurd on a tiny size 0-3 month outfit. I was unhappy enough with how it looked that I ripped it out and sewed a 1/4" hem with an additional row of topstitching along the edge.

IMG_11348 by you.

IMG_11349 by you.

Second, how the heck they expect you to be able to sew the hems on the sleeves is totally beyond me. I ended up ripping open the side seams so that I could open it up flat, sew on the binding, and then sew it back up. If I ever make another one of these, I'm going to be sure to do my hemming BEFORE I stitch everything up and overcast the edges.

A last note about working with the flannel instead of regular cotton: because the weave is a little looser, it is not as forgiving when you make mistakes and have to rip out seams. If you look closely at the pic above of the pants, you can still see all the holes from where the original hem was. Also, the edges tended to fray more easily and the fabric is overall less stiff, so it was a little trickier to keep it pinned into the bias tape. But like I said, it all worked out fine in the end, so don't be afraid to try it. I'm pretty happy with how this outfit turned out, and I'll likely make more in the future.

Saturday, August 29, 2009

Birdie baby shower

I apologize for the lack of posts lately, but I have been crazy busy getting ready for a baby shower I'm hosting and I didn't want to post about anything I was working on for fear of ruining the surprise. But the shower was today and was a roaring success! I threw a bird-themed baby shower at my home for a good friend having her second little girl. She's obsessed with birds (the mom, not the fetus...yet) and is decorating the baby's room in a bird theme. So I thought why not throw a birdie shower?

I've noticed that birdie stuff is super popular lately, especially for kids and babies. I had some ideas brewing, but a simple google search brought up some really lovely ideas. I cribbed a few from this site and this one, and then it sort of grew organically from there.

I loved the idea of doing cupcakes with a "nest" of coconut on top. And I had the perfect recipe to go with it (for more on the food, check out my cooking blog). However, I had a really hard time finding the robin's egg candies that were pictured on several different sites. I'm guessing that they might have been easier around Easter time. So instead, I had to make do with Jordan almonds, which was less than ideal. In the end, I nixed the almonds and just left the cupcakes as is.

IMG_11002 by you.

My best friend gave me the idea to do a kind of bird garland made of felt. She even went so far as to make me a template and a few prototypes and mail them to me from out-of-state! I loved this idea, but I'm not entirely sure I executed it as well as it deserved.

IMG_11031 by you.

IMG_11028 by you.

I ran out of time to put wings on all the birds, and I probably should have thought of a better way to hang them too. Ideally, a tree branch of some sort would have been perfect, but I simply did not have the time or energy to find one or chop one down from the tree in my yard. Still they were very pretty individually, and I think that they'll look nice in the baby's room.

I also picked up a few birdhouses to use as decorations, but I kind of floundered at the last minute over what to do with them. Again, I ran out of time to paint them, but they were cute as a makeshift centerpiece, especially once I paired them with a "nest" made of green excelsior and some fake eggs.

IMG_11025 by you.

My mother-in-law even got in on the act, and sent me this beautiful birdhouse that I put in the entryway, next to the favor bowl.

IMG_11042 by you.

For favors, I ordered a bunch of bird-shaped soaps from Etsy, which I then packaged in a cellophane bag with a little excelsior nest.

IMG_11044 by you.

IMG_11035 by you.

Last but not least, I had a group craft. Neither the guest-of-honor nor I are much for shower games, so I thought this would be a nice little activity. I didn't want to do the typical onesie painting since this was a second baby and I knew that she already had plenty of clothes. Instead, I thought it'd be cool to do something that could go in the baby's room. So I bought some 6-inch square canvas boards and acrylic paint with the idea that everyone could decorate one small board, and then she could hang them all in some sort of grid in the baby's room.

Unfortunately, I didn't think this one entirely through before I started buying stuff. I realized that some of my guests were not going to be as thrilled with an art project as I would be and would beg off, claiming a lack of artsy-craftsy skills. I thought that perhaps making stencils would make it easier, but the more I thought about it, the less I thought that people would want to mess with paint.

Instead, I decided to have them do paper cut-outs. I recruited my wonderfully talented friend Jacki to make templates so that people could just trace, cut and paste. Then I conscripted my very patient and understanding husband to help 'prime' the canvases by painting them solid colors. This may be the only photo you will ever see of him on this blog, haha!

IMG_10988 by you.

Here are the finished canvases. I think they look fantastic, especially against the tablecloth, which is more or less the color of the baby's room. Now we just have to figure out how the heck we're going to hang them, haha!

IMG_11038 by you.

Sunday, May 10, 2009

Scary new apparatus


I've been toying with the idea of a getting a serger on and off for some time now. Mostly, I'd dismissed it as an unnecessary luxury since I couldn't bring myself to spend the money on a decent one. Also, I've always been intimidated by how often I've heard they're not that easy to use. But as luck would have it, a cheap used one sort of fell into my lap, and after getting over my initial reticence (and some technical difficulties), I think I may be in love!

I'm still playing around with it and getting used to how it works, but I decided to start simple with some diapers and wipes. I must say, this is MUCH faster than turning and top-stitching, although I do still think that Tn'T looks more finished. But assuming I can figure out how to make a rolled hem, this will be super handy for doing a quick finish on the bottom of dresses, and I'm hoping to also figure out how to gather with it so I can make some twirly skirts for E. She loves to spin around in circles lately!

I suspect this will end up being a love/hate relationship as it looks like a bitch to thread (I'm hoping to never have to thread it from scratch EVER), and I'm also highly intimidated by the fact that blades are involved.

Anyways, here are the first few things I've made with it! The diapers still look a little rough, but I'm happy enough with them.

Tuesday, May 5, 2009

More bibs and the dino dress!

I am on a crazy sewing streak lately. I just can't rave enough about my new machine. It's really made sewing so much more fun! Nothing crazy exciting this week. More bibs, this time for one of E's little friends. Sorry the picture is sorta crappy - I had to rush to snap a quick one since the girls decided to put them on and wear them around the house.


I also whipped up this bib and burp cloth set for a friend who needed a shower gift. It's funny because I've had this flannel for a while, and I had been feeling sort of 'meh' about the print, at least in regards to making anything for E, but I think it was perfect for something for a little baby.


And last, but not least, I finally finished the dinosaur print sundress! I'm really happy with how it turned out. I managed to find some green grass-looking fabric to go with it, which I though would be apropos since at least some of the dinosaurs on there are herbivores. Hee!


And because I love this print so much, here's a close-up. I'm feeling really glad I bought extra now to make other stuff later.


The shirring went much much more smoothly this time around, partly because I did not cut it as wide, so it didn't have to be gathered quite so much, but also partly because I upped the tension so I didn't have to pull the threads at all! I also came up with a nice little trick to keep all the loose ends out of the way - Scotch tape! I taped all the ends to one side, which kept me from accidentally sewing over them, as well as kept them exactly in place when I stitched the knots down. And since it was off to the side, I never had to sew through it; I just pulled it off when I was done and trimmed the threads down.

And not to keep harping on my machine, but I have to say, having an overcast stitch makes all the difference in the world! Look how much neater and more professional the inside of the dress is. I don't know how I ever lived without it!


I spent this past weekend doing a major inventory and reorganization of my fabric stash. I managed to clean out a lot of odds and ends and get everything stored in a more efficient manner. Mostly, what this means is that I can actually see the top of my sewing table again! And hopefully, it'll stay that way from now on.

Thursday, January 15, 2009

Unintentionally looonngg hiatus

Whoa. I can't believe it's been a month since I last posted! But the holidays got pretty crazy on me there. Between a holiday baking, hosting playdates, all of us getting sick, and a somewhat last-minute decision to drive up to the Midwest for the holidays, it was a busy busy month. Also, I had a surprising surge of Etsy sales in the weeks leading up to Christmas. Who knew that crochet food would be so popular?

In any case, I did not get much of anything done over the holidays beyond restocking my Etsy store with stuff that I'd already made before. Sorry, I'm boring. However, I did get a fancy new sewing machine for Christmas (well, technically, I just got it last week) and I must say, I think I'm in love! It's a huge upgrade from the cheapy Walmart machine I was using before and now I'm starting to wonder how I ever got anything done before!

I'm really excited to finally make a dent in the giant stack of fabric on my sewing table. However, I'm still learning how to use all the bells and whistles, so I thought I'd start off with a few easy projects. I'd promised to make some bibs (among many other things) for a friend months and months ago and finally got around to them last weekend. One has bias tape around the edge, which I actually tried to sew on the "right" way. The others are just turned and topstitched.


I also made a couple more for E while I was at it since the teeny baby bibs I've been sticking on her haven't been keeping very clean lately. Oh, and these are all made from flannel on one side, and knit from recycled t-shirts on the other. Cheap and easy, my two favorite words when they're not describing me.


Next up, I'm working on a tutu for E. Yes, I know, it violates my 'no pretty princess crap' rule, but she loved the one she wore at friend's house, so how can I deny her? I've got it about 1/3 done, but I need to pick up some ribbon or something to bind the waistband. Hopefully I'll get it done this weekend.

Monday, November 17, 2008

Egad.

I've got baby leg warmers coming out the wazoo. Pictured above are 14 pairs of babylegs. Granted, some of them were ones I made earlier this year, but I also left out 6 new pairs that I sold/gifted. Oh and one Halloween pair that I obviously dropped the ball on. Oops. I really had to force myself to get through these and I'm thinking I may never make them again. Well, except for the two pairs of socks that I specifically bought for E. And maybe if I see some really cute Christmas-y ones. Argh, I suck!

I actually managed to be fairly productive this past weekend though. Besides the babylegs marathon, I also managed to get some knitting done. So I'm slowly but surely making a dent in my huge to-do list.

Thursday, October 2, 2008

Warming up the babylegs machine...

Now that it's October and Fall is finally upon us here in Texas (that is, if you think of 85 degrees as fall weather), I thought it was time to crank out a new batch of baby leg warmers! Actually, a request from a friend is what got me started thinking about it, so I'll kick it off with a pic of the adorable Halloween legs that I made for baby M.


The only real struggle I'm going to have with this is forcing myself to sell them instead of keeping them all for E. Never mind that she still has the dozen or so pairs that I made her last year, all of which are still perfectly fine. In fact, I can't help but show off the cute outfit she wore some with just yesterday.

Wednesday, September 24, 2008

How can you resist this face?

Yesterday my friend Chrystyna came over with her adorable daughter Mackenzie, and I couldn't resist putting this pumpkin hat that I had just finished on her. I decided later that afternoon that it needed a little leaf on top, so here are some more shots of the hat with the leaf (but minus the cute baby), now on sale in my Etsy shop. :)


Monday, September 15, 2008

Busy busy busy

Even though it's been a while since I've posted anything new, don't think I haven't been working on stuff! I recently finished a couple baby hats that are gifts for friends who are expecting little ones soon, and I didn't want to ruin the surprise. I figured what better hat for fall than a little bitty pumpkin hat?! It's been a long time since I made any tiny newborn hats. Ah, I can feel the baby lust taking hold.

This is actually the second hat I made. I forgot to take pictures of the first one, but hopefully I'll have pics of the hat ON a baby soon!


And even though I really should be working on stocking my Etsy store, I've been doing more personal sewing lately. In fact, just tonight I made this little doll for E. I still need to embroider her face on (which should be interesting since I've never embroidered anything in my life!), but you get the general idea. I think for a first effort, she turned out pretty darn cute!


Here's another shot where, if you look close, you can sorta see where I penciled in her face:

LinkWithin

Blog Widget by LinkWithin