Monday, October 12, 2009

I hate hot glue

I've never been big on bows. I think they look super cute on some kids, but they never seemed to go with my kid's personality. Plus, I just could never be bothered with them. However, lately my kid seems to prefer clips in her hair to ponytails, so I thought I may as well jazz them up a bit.

I recently saw this tutorial on how to make felt flowers and thought they'd make for cute hair clips. Super fast and easy and a great project to do in front of the TV. However, when it came time to glue them to the clips, I had nothing but trouble. Have I mentioned that I hate working with hot glue?

In the past, I'd covered some alligator clips with ribbon and again, had a helluva time getting the ribbon to stick properly. And even once I did get them on like I wanted, they ended up falling apart because E kept pulling them out of her hair and chewing on them. Ah, toddlers.

Anyways, after futzing with them for quite some time, here are two finished clips.
IMG_11540 by you.

And a pic of E wearing the Halloween one.

IMG_11551 by you.

The flower promptly fell off the clip about 30 seconds after I snapped the picture. I didn't even get that far with the red one. *sigh*

A friend told me I need a high-temp glue gun (I have low-temp). And that I have to be very very generous with the glue. I'm thinking I may find some other kind of adhesive because I've had it with the stupid glue gun.

Sunday, October 11, 2009

Another birdie sling

IMG_11545 by you.

A friend commissioned me to make another Amy Butler birdie sling bag for her to give as a gift. She picked out all the fabric (and did a fantastic job, as I adore the colorways) and I finally got it all sewn up the other day. These bags definitely get easier to make the second time around. I'm hoping it'll be even easier the third time, as I actually have all the fabric to make one for myself; I just haven't gotten to it yet. I think it's because I can't stand cutting & ironing all the fabric and interfacing, so I keep putting it off.

Here's a pic of the inside. I added a magnetic snap closure, which I meant to do last time but then forgot. Oops. I also used some of the leftover fabric from the exterior to make the interior pocket since I prefer a little contrast.

IMG_11547 by you.

I'll also reiterate my complaint that the pattern calls for WAY too much fabric for the bands and handles, especially is you use 60" wide home decor fabric. I think I got 3/4 yard instead of the 1 1/4 called for, and I still had a ton leftover. Next time I may take it down to a 1/2 yard and see if that works better.

Friday, October 2, 2009

Pants, pants, pants!

IMG_11358 by you.

For a long time, I've been intimidated by the thought of making pants. Or bloomers. Or pretty much anything with a crotch. It mostly stems from the time I tried to make a little romper for E and the crotch turned out just awful. Weirdly misshapen, with a point in the back, almost like a deformed tail. I've avoided anything crotch-y ever since.

My uber-crafty and ultra-wise friend,
Jacki, kept telling me how easy it really was and pestering me to try again and I finally decided to give it another go last weekend. She even traced a pattern for me and wrote out detailed directions. Of course, she was totally right (as usual). In fact, I knocked out these three pairs of flannel toddler pants in an afternoon! The sheep ones are for a friend's daughter. I also happened across a t-shirt I'd bought for either tie-dye or applique, but never used, so I put a little heart on that with the same sheep fabric as a bonus.

IMG_11356 by you.

The owl pants are for E. She also picked some ladybug flannel out of my stash for another pair of pants, but I realized I needed to wash the fabric first, so I'll probably do those another time. I'm thinking these will mostly end up being pajama pants or just lounge-around-the-house pants, especially once the weather gets cooler.
IMG_11355 by you.

And just in case you're wondering, the pattern is from the Kwik-Sew for Toddlers book, which I also got on strong recommendation from Jacki. It has really good, basic patterns for shirts, pants, etc., and they also give you instructions on how to alter the patterns to make them longer or shorter as needed. Perfect for my tall, skinny kid. So if you can look past the grotesquely dated fabrics on the cover, it's a really good book to have. I'm really eager to try and make some knit easy-pants and leggings next so I don't have to keep buying them from American Apparel!

Monday, September 28, 2009

Birdie kimono set

IMG_11350 by you.

I'm ashamed to admit, I have had this outfit 75% done for the last 2 months, only to get stuck on the binding and put it aside in frustration. Well, the pregnant friend that this was for had her baby last week, which lit a fire under my behind to get it done.

It's the Kimono PJ Set from Amy Butler's Little Stitches for Little Ones book, generously loaned to me by the above no-longer-pregnant friend. I had the bright idea to do it in flannel instead of cotton, thinking it'd be cozier. This actually worked out fine for the most part, except for the binding, which I foolishly also tried to do in flannel. Here's a tip for anyone trying to make tiny flannel bias tape: don't do it. Trying to get 1/2" flannel single-fold binding to hold a sharp crease was next to impossible. And then folding it over and pinning the now 1/4" on each side? Infuriating.

So instead, I went and bought some double-fold bias tape from the store and sewed it on the "wrong" way (meaning, I just jammed the raw edges into the fold instead of opening it up, sewing along the crease, then folding and sewing again). I also opted to put binding along the cuffs of the sleeves too. I think it added a nice finished-looking touch.

IMG_11346 by you.


Like other Amy Butler patterns I've tried, this was not a difficult project, but there were a lot of steps and the directions can be confusing at times. I think I read them about 20 times before I started, just to be safe. My main complaint though is that the pattern instructions were a bit lacking in common sense.

First off, folding 1/2" hems on the bottom of the pants and the bottom of the kimono top looks totally absurd on a tiny size 0-3 month outfit. I was unhappy enough with how it looked that I ripped it out and sewed a 1/4" hem with an additional row of topstitching along the edge.

IMG_11348 by you.

IMG_11349 by you.

Second, how the heck they expect you to be able to sew the hems on the sleeves is totally beyond me. I ended up ripping open the side seams so that I could open it up flat, sew on the binding, and then sew it back up. If I ever make another one of these, I'm going to be sure to do my hemming BEFORE I stitch everything up and overcast the edges.

A last note about working with the flannel instead of regular cotton: because the weave is a little looser, it is not as forgiving when you make mistakes and have to rip out seams. If you look closely at the pic above of the pants, you can still see all the holes from where the original hem was. Also, the edges tended to fray more easily and the fabric is overall less stiff, so it was a little trickier to keep it pinned into the bias tape. But like I said, it all worked out fine in the end, so don't be afraid to try it. I'm pretty happy with how this outfit turned out, and I'll likely make more in the future.

Sunday, September 27, 2009

Bumblebee tutu

IMG_11352 by you.


Despite my desire to be uber-crafty, I opted not to make E's Halloween costume this year. Being the ornery & mercurial little toddler than she is, I had a feeling that after killing myself to make her costume, she'd refuse to wear it. Instead, I picked up two moderately priced store-bought costumes that are big enough for her to wear for dress-up for a good long while. I figure she can pick whichever one she wants on the day of.

One of them is a bumblebee costume from Old Navy, which mainly consists of a fleece vest with wings & a hood. I thought it'd be cute to have a tutu to accompany it. There are a million tutorials all over the web on how to make no-sew tutus (in case you're too lazy to search, you basically just cut strips of tulle and knot them around elastic or ribbon). For some reason, the idea never really appealed to me until now, and I have to say, it was crazy mega easy.

I picked up a couple rolls of tulle on sale at Hobby Lobby last week, and I already had some black elastic laying around that I sewed into a loop. After that, it was just cutting & knotting. I did the whole thing in front of the TV and finished it in just an hour or two. And it cost under $5. My kind of project.


Of course, as expected, my child refuses to wear it. Or even touch it. I'm hoping that she comes around soon, but if not, whatever. At least I didn't spend a ton of time or money on it.

Saturday, September 26, 2009

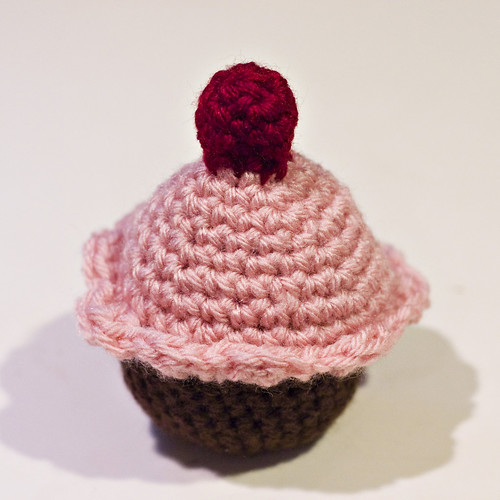
Birthday cupcake


I whipped up a quick little cupcake last week for a sweet girl turning 2 years old. Unfortunately, me throwing my back out and the subsequent appointments that followed interfered with me being able to give it to her on her birthday. But I thought I'd go ahead and post it here, just for giggles. I'm not entirely happy with how the cherry on top turned out, so I may take it off and do it over.

Thursday, September 17, 2009

Return to knitting!

I honestly can't remember the last time I knit anything. Between the unbearably hot Texas summer, my newfound obsession with sewing, and also just general impatience for how slow knitting can be, I sort of lost interest for a while. But last weekend, I went to visit my best friend in Philadelphia and at the last minute grabbed one of my many unfinished projects work on during the plane ride.

It turned out to be a lifesaver as my flight ended up delayed over 3 hours; I had no music to listen to, and I couldn't focus enough to read the book I'd also brought. I'd forgotten how soothing it can be to just mindlessly knit while watching crappy TV or chit-chatting with a neighbor.

Sadly enough, the project I brought ended up frogged, but I did find some fun new yarn & related supplies to work with on my trip. I got a very cute toddler sweater pattern and some more circular needles (one can never have too many!) at Loop. I also couldn't resist some of the adorable fat quarter bundles at their sister store, Spool. And then I picked up some crazy fun "marshmallow" yarn at Nangellini, which I ended up mixing with some hot pink eyelash yarn to make this funky scarf.


I very rarely work with bulky yarns, and it was really gratifying to be able to start and finish a project in a day. It really re-inspired me to pick up my knitting again and now I'm combing through my various bookmarked and queued patterns trying to decide what to work on next. In retrospect, I should have sprung for a second ball of the marshmallows so that I could have done a tighter knit, but I think the eyelash yarn fills in the holes nicely. I also picked up some super soft green & brown variegated wool that was half off. Score! Not sure what I'm going to do with it just yet though. Oh and of course the pattern I bought calls for bulky yarn, which I don't have, so I guess I'll need to make another trip to my favorite local yarn store. ;)

Oh, and I had to come back and add that the yarn stores I went to in Philly were so different from one another, but both absolutely fabulous! Nancy, the owner of Nangellini, was particularly friendly and cool and my friend and I had a great time chatting with her.

LinkWithin

Blog Widget by LinkWithin