Thursday, February 11, 2010

Valentine's outfit

IMG_0452 by you.

About a month ago, I bought some heart-themed Hello Kitty fabric with the idea of making E a special Valentine's outfit.  I had originally planned on a pillowcase dress or the like, but when I saw my friend, Chrystyna of Kenzie Kouture, making these adorable embroidered heart shirts for Valentine's Day, I couldn't resist ordering one for E.  Instead of a dress, I made a tiered ruffle skirt to match.  I absolutely love how this turned out!

This was also a great opportunity to use my new serger! I know, you're thinking "wait a second, didn't you already have a serger?"  Well, long story short, I sold the old serger because I never used it (and it sort of scared the crap out of me).  Then I realized I desperately needed one for the Great Ruffle Project, so I ended up getting a new one.  Thanks to some hand-holding by now I'm totally over my serger fear and LOVING it!

I was especially excited to try out a rolled hem with wooly nylon, although I had a bit of trouble with it and the bottom tier ended up being a bit shorter than I intended, especially on one side.  Oops.  I had originally intended to use the serger to gather the tiers too, but it didn't quite work out the way I wanted, so I ended up using the ruffler foot on my regular sewing machine instead.  I have to say, I absolutely love that thing!  It made sewing this skirt so quick & easy, and I ended up with pretty much perfect gathers for each tier.  I'm definitely going to make more of these in the future.

Here's a shot of just the skirt.
IMG_0442 by you.

I usually put some kind of ribbon tag in the waistband to distinguish the front from the back. I couldn't resist using some Hello Kitty ribbon that my cousin gave me.
IMG_0443 by you.

My love for HK has definitely rubbed off on my daughter.  E was very excited to wear this outfit to her school Valentine party today!  She also wore Hello Kitty socks and rain boots - she's very into matching too, haha!
IMG_0454 by you.

I ended up whipping up another skirt or one of E's little friends too.  I'm thinking that with spring around the corner, snow notwithstanding, I may start selling these!
IMG_0484 by you.

The Great Ruffle Project of '10

IMG_0441 by you.


About a month ago, a friend of mine asked me to make some costumes for a high school musical she's directing.  Specifically, she wanted seven tango-style skirts.  I rarely work from patterns, but I am generally good at picturing how I want things to turn out, so I agreed to give it a shot, even though I've never made anything like that in my life.  Little did I know that I would end up knee-deep in ruffles!

Basically, I wanted to make a wrap-style skirt that has a high slit up one leg, and then I attach layers of ruffles to the skirt.  In my head, this all sounded very simple and straightforward.  So off to the fabric store we went, where we picked out a bunch of glittery satin-y fabric in four different colors, as well as a drapey black jersey for the skirt bases.  I think in total, I ended up taking home about 20 yards of fabric, easily the most I've ever bought in one go, for one project!

My original plan was to cut long, 7" wide, single strips for each row, and then to gather those strips. But after spreading out 4 and 5-yard swaths of fabric across my floor, I realized that not only would it be exceedingly difficult to cut a 4-yard long straight line, it would also be a tremendous pain to pull & gather that much fabric.  Instead, I cut strips across the width of the fabric, which was just shy of 60 inches.  I probably should have seamed the pieces together, but in order to save time, I opted to slightly overlap them when I sewed them on.  I think the overlaps are barely noticeable.
IMG_0197 by you.

The other thing I failed to think through was just how long it would take me to make all these ruffles.  I did the math at one point, and I think it came out to around 100 yards worth of fabric strips that needed to be gathered!  Can you believe I thought I'd be able to do this by sewing basting stitches and then pulling and gathering hand?  That insane delusion lasted long enough for me to make one very pathetic-looking ruffle before I started searching for other ideas. 

Lucky for me, I have lots of very clever sewing friends, one of whom suggested a ruffle foot, and another of whom was extremely kind and generous enough to loan her ruffler to me.  Can I just say, that ruffler saved my freaking life?! 

Here's a pic of the ruffler foot.  It looks like a totally insane and intimidating contraption.  There are a number of moving parts, as well as various knobs and dials that need to be adjusted, so there is a bit of a learning curve to overcome.  But once you've got it set up properly, it makes the most beautiful, evenly spaced gathers!  I loved it so much that despite being rather pricey, I went out and bought one for myself!  One word of warning though, because it does move and shake so much, I noticed that after a while, some of the knobs tended to come loose, particularly the big one that holds the foot onto the shank of my machine.  So if you're going to be using this for big projects, make sure you frequently give everything a quick twist to tighten.

Once I had all the ruffles done, it was a simple matter of attaching them to the skirt bases, turning down the top to make a simple waistband, and then adding velcro closures.  Although when I say simple matter, I should mention that it still involved hours of careful pinning, haha.  And there was also the not-small issue of having to finish the edges of the satin, which unravels like crazy.

IMG_0447 by you.
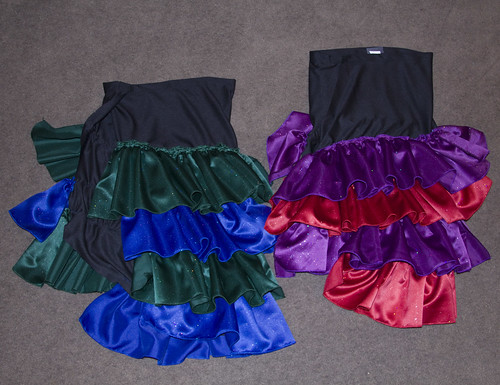
In any case, here are two of the finished skirts.  I ended up doing 4 in green/blue and 3 in red/purple.

It's very difficult to get a sense of how these really look when they're just laid out on the floor, so here is a picture of the back one skirt pinned around a pillow. Basically, the ruffles start just below the buttocks, and the slit goes almost all the way up the thigh.  The hemline is tapered a bit, so they are longer on one side.  My understanding is that the girls are going to be wearing these with black leotards, black tights and maybe black booty shorts too.  I'm hoping to be able to get a picture of them in action at some point.

Wednesday, February 10, 2010

A bunch of FO's - and more on the way!

Yes, I've been MIA.  No, I have not been slacking off.  In fact, I've been so busy that I haven't even had time to post!

I've been doing some major cleaning and reorganization of my craft room, which included the purging of stuff I know I was never going to get around to using, as well as finishing up a few old projects that have been hanging around.  I've also been working on the biggest sewing project of my entire life (yes, bigger even than the Christmas quilt), which has consumed pretty much all my free time these last few weeks.  I'll have to save the details for a separate post.

First up, a granny-square afghan.  I originally started this as a gift for someone about 7 years ago.  I love the pattern for this square, but it was extraordinarily time consuming because of all the color changes. I got about 1/4 of the way done and realized it was going to take me a million years to make it as big as I wanted, so I abandoned ship and did a different, faster (one-piece) design.  Which left me with roughly 1/4 an afghan that then sat in storage, forgotten.  Fast forward to a couple weeks ago, when I found the squares in a bin and thought to myself, I may as well stitch these together and see what I can do with it.  I think it'll make a nice little lap blanket.  Or maybe baby/toddler afghan.  Still not sure what I'm going to do with it.  I thought about trying to sell it, but I'll probably gift it to someone instead.

IMG_0449 by you.


Then here's another hat that I actually finished a while back but just never got a chance to post.  It was a commission by a friend for her son, who wanted a football hat.  I had to come up with the fair isle football design myself, and I'll confess, I'm not 100% happy with it.  But I'm also not sure how I could have improved the shape of it.  I do otherwise love it though, especially the yarn I used, which was a wonderfully soft & yummy wool/bamboo blend.

IMG_12607 by you.


I have two more finished hats too, but I keep forgetting to take pictures of them. One is a hat I started last month as a gift for a friend's daughter.  It has a fair isle heart design all around it, which I adapted from a pattern book.  I love the hearts, but unfortunately, it turned way too big, so now it's probably going to end up as a hat for E.  Or I may put it away and sell or gift it next winter.

The other one is a hat I made for E.  After seeing the owl hat I made for a friend's son, E requested one of her own.  Knowing how rough she is on her things these days, I opted against using the same wool/cashmere blend yarn and instead picked up some Lion Brand Thick & Chunky Wool-ease.  It turned out a teeny bit bigger than the original, but she seems to be ok with it.  I still need to sew on the face, which I've been rather lazy about.  I'll try to get pics up soon.

Edit: here's the heart hat!
IMG_0579 by you.

Tuesday, December 22, 2009

Hot pads tutorial

IMG_12187 by you.


I know there are only a few days left before Christmas, but there's still a little time left to whip up a few quick gifties.  So I figured why not go ahead and put up my very first tute?

I love to bake, but I hate oven mitts and find most other potholders bulky to use.  I've always wanted something that I could use to quickly grab a cookie sheet out of the oven or a hot plate out of the microwave.  I remembered seeing this blog post a while back about making little round pads that had pockets for your fingers.  I wanted something slightly different, so I thought I'd give it my own spin.  This is a great way to use up scraps and other odds and ends from your stash.  I actually had all the supplies necessary to make these already on hand - ah, the benefits of being a fabric hoarder.

Saturday, December 12, 2009

Doll quilt

I had a bunch of extra squares leftover from my Christmas quilt project that I realized would be perfect for a doll quilt for one of E's Christmas gifts. She is very very into playing with her animals and baby dolls lately, and spends a lot of time making elaborate beds for them out of couch cushions, blankets from her own bed, and bits of fabric from my scrap bag. It's actually pretty hilarious to see her "sleepover" set up all over the living room floor.

The doll quilt also was the perfect opportunity for me to get some practice with free-motion quilting, which I'd never done before but have been wanting to try. I have to say, it was a bit difficult, but I really enjoyed it! I think I still have a long ways to go before I really get the hang of it, but I'm fairly sure I'm going to go ahead and use this technique on my big Christmas quilt.

Here's the finished doll quilt, front:

IMG_12048 by you.

And back:
IMG_12052 by you.

And an "action shot" where you can see the quilting in a bit more detail:
IMG_12051 by you.

I cheated on the finishing and instead of making binding, I left a 1 1/4" border all around of the backing fabric, which I then folded over twice, pressed, and stitched down. WAY easier than dealing with binding. I'm actually pretty happy with it overall. Not bad for using up odds and ends I had laying around!

The only thing I have left to do now is wash it, which I'm actually sort of terrified to do. Normally, I prewash and dry all my fabric, but since I used the layer cake, that wasn't an option. The ladies at the quilt shop told me that it was better to keep it all the same, so wash everything or nothing. I'm really nervous about how badly the red fabric is going to bleed, especially since I have pure white squares in the mix. I think I'm going to do a trial run with one of those 'color catcher' sheets and see how it turns out. I keep telling myself, "it's only for a doll, it's only for a doll..." But if it does bleed, I guess that means that the full-size version will never be washed. *sigh* Keep your fingers crossed on that one.

Of course, now that I've made this little doll accessory, I feel compelled to make some little clothes for E's dolls and animals as well. She's actually been asking me to do this for a while, and I think I'm finally going to suck it up and make a few outfits for her stocking stuffers.

Friday, December 11, 2009

Way way behind

I've been sick on and off (but mostly on) for the better part of the last month. It's been really frustrating to not feel 100%, but even more than that, it's been driving me crazy how far behind I've fallen with my holiday crafting. I swear, my list just keeps getting longer and longer as I see more and more cute ideas for gifts and such.

The only project I've managed to finish recently is the tree skirt I started over a month ago for E's little Christmas tree. She's so excited about Christmas this year that we thought it'd be cool for her to have her own little (fake) tree in her room that she could decorate herself. I decided to make a little tree skirt for it, loosely based on this tute. Obviously I made hers a lot smaller, 26" diameter, and because of that, I also opted to only use 6 pieces instead of 8. I won't go into boring details, but if anyone's interested in how I did that, just post in the comments. ;)

IMG_12025 by you.

I actually am extremely unhappy with how the tree skirt turned out, mainly because I screwed up the binding pretty badly. It's extra sloppy (and don't even get me started about how the backside looks), so sorry, no close-up shots.

IMG_12027 by you.

IMG_12028 by you.

So since I lamely have nothing else to show for the past few weeks of sickies, I thought I'd post about some WIPs and a few links to cool projects that I'd like to attempt to have done in time for Christmas. Some are decorations, some are toys, most are holiday-oriented.

I have a couple commissions I'm almost done with, one knit and one sewn, and I'm also trying to concurrently work on some handmade Christmas gifts for friends and family. I really want to post a tutorial for the gifties, but I also don't want to ruin the surprise...decisions, decisions.

I'm also still hopeful that I might be able to finish the Christmas quilt before Christmas. I have, however, given up on hand-quilting. Partly because I just didn't like the look of it, but mostly because I regained my sanity and realized that it would take me about 10 years to finish it by hand. Now I'm thinking I may give free-motion quilting a go.

This weekend's big project is baking! I'm hosting a cookie exchange next week and I have LOTS of baking to do. I still haven't entirely decided on what kind of cookies I'm going to make for the exchange, but being the overambitious nerd that I am, I also want to make decorated cookies for everyone. Going to be a busy busy weekend.


In a perfect world, I'd also have time to make some of this stuff:
Felt circle garland
Origami star
Paper evergreens
Salt-dough ornaments
Crochet snowflakes
Snowman decoration

Thursday, December 3, 2009

Christmastime is here!

IMG_12020 by you.

I love Christmas and all the hoopla that surrounds it. I'm especially excited this year because not only are we not traveling for a change, but my daughter is finally old enough that she really 'gets it' when it comes to holidays. It's really fun to see everything through her eyes for the first time again.

PBK Advent treeThat being said, she has already started driving me nuts asking me, "Is it Christmas yet?" So I thought an advent calendar would help her count down the days. I remembered seeing this calendar in the Pottery Barn Kids catalog a while back. But even if I did want to shell out major $$ for it, it's no longer available. Of course, crazy person that I am, I figured I could make a reasonable facsimile.

I decided to take advantage of the Black Friday deals at Jo-Ann's last weekend and picked up a yard or two of felt in several different colors (I figured whatever I didn't use I could save for other kid-crafts).

I wanted to stick with a tree, like the PBK one, but seeing as how I waited to start this till November 29, I knew I couldn't do anything too complicated, so elaborate embroidery or applique were out. Instead, I decided to make a felt ornament pocket for each day.

Starting with a yard of green felt, I cut out two large tree shapes (one top piece, one bottom). Then I made a couple ornament stencils on cardboard and cut out 25 in various colors. The balls are just under 4 inches in diameter, and the bulbs are about 5 inches long and 3 inches wide. I wanted them to be big enough that I could stick a little gifty inside instead of candy, if I felt so inclined.

I also decided to embellish some of the ornaments with some of the fancy decorative stitches on my sewing machine. Even though a lot of the stitching ended up obscured by the numbers, I think it adds a nice touch. I did sort of wish I had more stitches to choose from, but oh well. This was the first (and probably last) time I used almost every one of them.


Oh, I almost forgot. The Santa face on the 25th day is from a small felt stocking I found at the dollar store. I just cut him out and stitched him to an ornament shape. Again, I had originally planned to make on myself from scratch, but when I found one already made, of course I opted for the short cut. ;)

I stitched each ornament to the top tree piece using contrasting thread, and leaving the top open to make a pocket. I used one of the blanket stitches on my machine, but a straight or zigzag would have worked just as well. I cut two rectangles of brown felt for the trunk and two stars out of yellow for the topper and then stitched each of these together. Again, I used the blanket stitch, but you don't have to. That's the nice thing about felt, you don't have to worry about finishing edges or turning and topstitching.

Next I put the top tree piece on top of the bottom piece, sandwiching the trunk in between at the bottom. Pinned and stitched all the way around and then I stitched the star to the top. Really, you could probably skip this step, but

Last, but not least, I let E help me put the numbers on each ornament. I originally thought I was going to have to either cut out numbers from felt on my own, but then I lucked out at found sticky felt cutouts at Jo-Ann. I had to buy two packages to have enough numbers, but I managed to use coupons for both so that I only ended up spending an extra $5.

Actually, when all is said and done, this really was not a very difficult or expensive project at all. You could even hand-stitch this if you don't own a machine. Definitely could be made in a weekend - it took me the better part of 3 evenings to complete it. One to cut everything out, one to embellish the ornaments and figure out what order I wanted them all to be in, and then one to sew everything together.
Even with the "splurge" on pre-cut numbers, this whole project cost me less than $10. Take that, Pottery Barn!

Edited 12/11/09 to add:
Here are a couple close-ups, as well a shot of E standing in front of it, so you can get a better sense of scale.

IMG_12030 by you.

IMG_12031 by you.

IMG_12029 by you.

LinkWithin

Blog Widget by LinkWithin