
First up is my very first Ottobre pattern! For those that don't know what I'm talking about, Ottobre is a cool pattern magazine from Finland. They have a couple different editions, and a few months back I signed up for a subscription to the kids' version (in English, of course). They print all the patterns on a couple big sheets, overlapping in different colors, so it makes your head spin to look at and trace them, but once they're traced and cut they're not all that hard. Or at least, the one I picked was not.
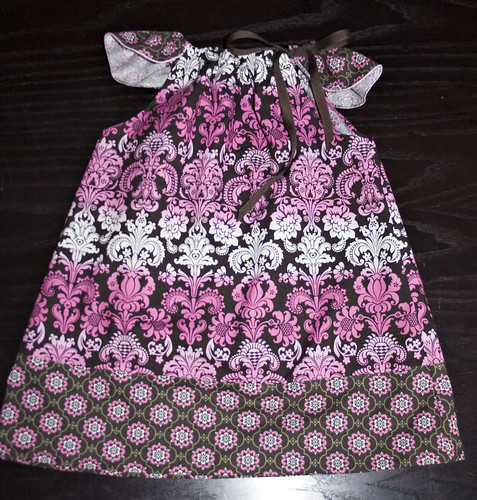
I picked this dress in particular, partly because it was cute and also because I knew it'd be easy. It's essentially a glorified pillowcase dress. I loved the addition of the little ruffle-y "sleeves" which are really just two petal-shaped pieces that are threaded onto a ribbon between the front and back pieces.
For those that are thinking of trying out this magazine, I'll warn you, the patterns do NOT include the seam allowance. I didn't realize this until after I'd already traced and cut my pieces. But because this is such a simple design, it was pretty forgiving and didn't make too big a difference - the arm holes are bigger than they should be and it's overall probably 2-3 inches shorter than I'd like as well. But as I mentioned before, I started this several months ago, and E has since grown at least an inch or two, which contributes all the more to the shortness.
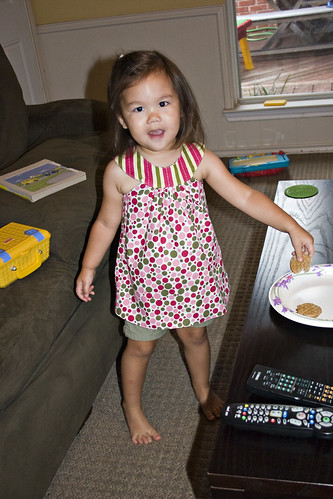
Here's a pic of E modeling it (excuse the milk mustache).

Next up is the PortabelloPixie reversible jumper (from the Gracie pattern) that I also started like, 3 months ago. After being pleasantly surprised by how easy the Claire peasant dress/top was, I thought this would also be a piece of cake. Oh, how wrong I was!
The pattern seemed straightforward enough until I reached the neck yoke, which I could not figure out to save my life. I read the directions over and over again and studied the diagrams till my eyes crossed, but I could not get it to line up or look remotely right. I even asked a couple friends who are much more experienced seamstresses, and they were also confused by the directions. Finally, one of them suggested a method totally different from the pattern instructions that made more sense. Still, my frustration was such that I needed to put this project aside for a while.
I decided to come back to it last week, when I discovered it hiding under a pile of fabric as I was cleaning off my sewing table. Like I mentioned before, I'm trying really hard to clear out my backlog of projects before I start new ones and/or buy new fabric, so I figured it was about time I finished it up. Also, I realized that if I waited any longer, it would probably be too small for E to wear (she has had the most insane growth spurts lately), not to mention that summer is almost over.
Not to bore you with the details of how I ended up putting the neckpiece, but for anyone else out there who is attempting this pattern, here's what I did (everyone else skip to the next paragraph):
Instead of sandwiching the entire top between the upside-down neck yoke pieces, I separately sewed the yoke pieces wrong sides together and left spaces to insert the front and sides of the main body of the jumper. Then I turned it out and pressed it, making sure to fold the raw edges under, and then stuck the gathered top and the sides of the body inbetween. Then I topstitched the entire yoke piece to secure it. The big downside to doing the neck this way is that you're sort of flying blind with how the bottom side is going to line up. I ended up ripping a few sections and re-doing them more than once to get it to look right and I'm still not totally happy.
So let's just say that this way was still kind of a pain in the ass, but it got the job done. However, I was rather excited to finally use the buttonhole function on my machine for the very first time! Woohoo! I had no idea how easy it would be!
Here is the finished product. I didn't like the way the pocket looked, so I left it off.
I'm about 90% happy with it. The neck is still kind of a mess and I wish that I'd done a neater job topstitching overall, but honestly I'm more annoyed that what was billed as a reversible jumper is really not that reversible unless you sew buttons on both sides, which I think would be uncomfortable for a kid to wear. So I feel like I went to all this trouble to use the two fabrics and line up seams, and it was all for naught. Also, I don't know why it has you turn the jumper right sides out and topstitch before sewing the bottom hem together. Seems like a waste since you end up having to turn both sides in and sew it at the end.
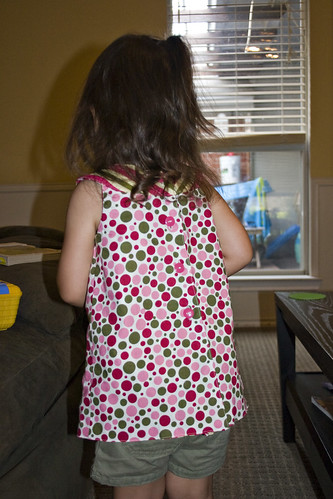
Here's a shot of the back.
Still, I guess it is pretty cute and I did get a lot of compliments on it when E wore it out today, so I can't complain too much. It's just not the best written pattern, in my opinion, and if I ever make it again, I'll likely ignore the instructions.
2 comments:
very cute! i love both outfits!
Looks like Mac might have a couple shirt/dresses headed her way ;)
Post a Comment