Tuesday, June 22, 2010

Me, Myself and I

Since I started sewing a little over 3 years ago, I have rarely, if ever, made anything for myself.  I've made tons of clothes for E and her little friends, but for some reason, I've always been too intimidated to make clothes for myself.  It's actually a bit silly when you think about it.  I'm not a petite woman by any stretch, and I have a difficult time finding clothes that fit me properly, especially across my bust, so you would think that the first thing I'd make would be my own clothes!  I finally decided that it was about time I got over this particular hangup and set out to make myself a summer wardrobe.

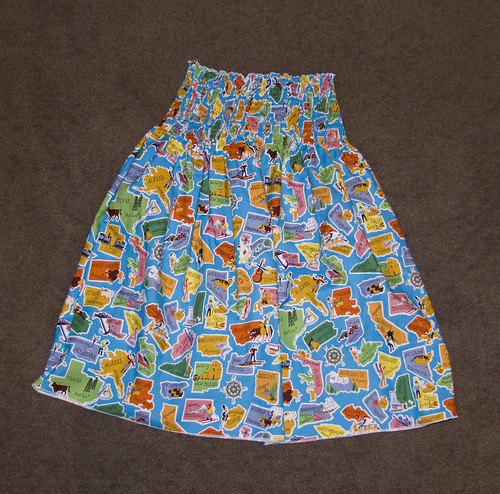
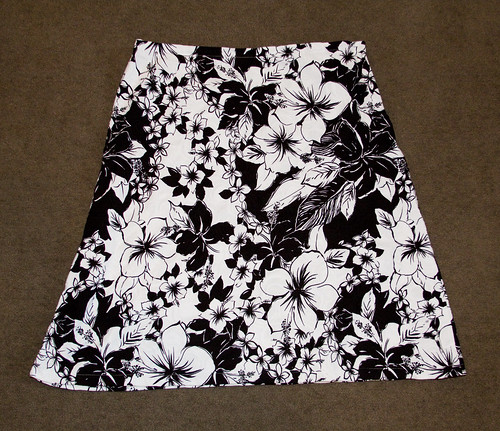
I started out with some simple A-line skirts.  Using the guidelines from Sew What! Skirts (a fabulous resource - I highly recommend it), I drafted a simple pattern and made 2 skirts with side zippers.  The first one is a bottomweight cotton print.

IMG_1905 by you.

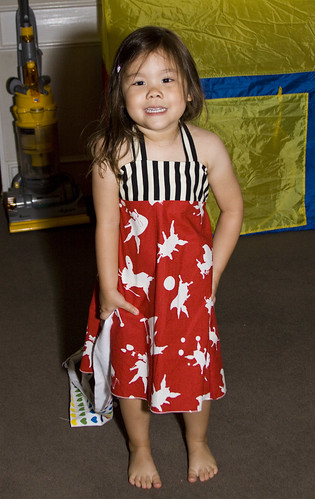
[I normally despise posting pictures of myself, but I realized that it's hard to get a sense of how these items look unless they are on, so bear with me and excuse the filthy bathroom mirror. :p]

IMG_1816 by you.

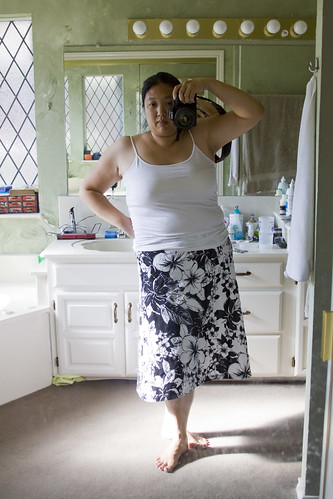
Have I mentioned that this was also my first time putting a zipper in a garment?  It was way easier that I expected!  I don't know what I've been waiting for.  The second one is similar, but not quite done yet, so I'll post it when I get around to finishing it up.
 
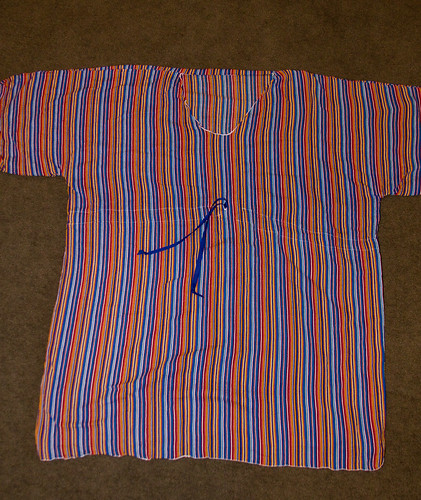
It's impossible to get through a Texas summer without spending a lot of time at the pool or sprayground (for all you Northerners, it's basically a park or playground with water features for the kids to play in).  And even with a generous coat of sunblock, it's hard to keep from getting burned.  So inspired by a caftan my friend Valerie picked up while in Miami, I decided to try and make my own caftan-style swim cover-up.  It's basically a giant rectangle of printed cotton gauze that I sewed into an oversize "T" shape and then added a casing and ribbon drawstring.  I rolled all the edges too, mostly out of laziness. ;)


IMG_1904 by you.  

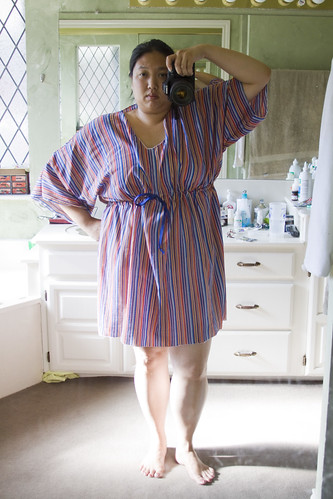
I do wish that the shape of it was a little more flattering on my body, but it serves its purpose well.  The bonus of using gauze is that it's super lightweight, so even if it gets wet, it dries very quickly.

IMG_1820 by you. 

Last, but not least, I made my very first top!  It's Kwik Sew 3610, in case you're wondering.  I always used to see tops like this in the store, but could never find one that fit me properly, particularly over the bustline. 

IMG_1908 by you.

IMG_1910 by you. 

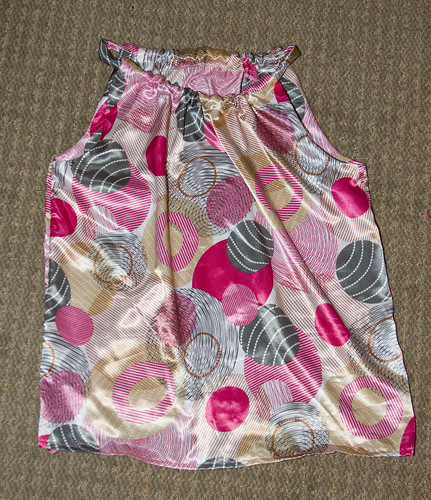
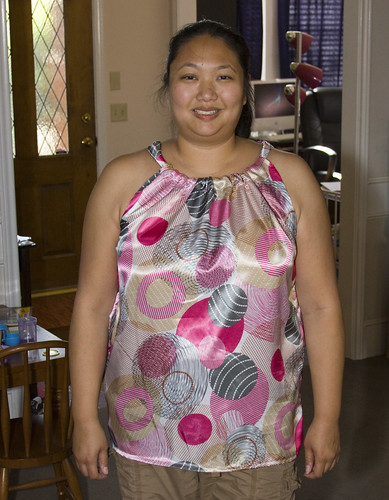
This was also my first time working with this kind of shiny, silky fabric, and I have to say, I did not enjoy that part at all.  It was extremely difficult to keep lined up while sewing (even with a billion pins), and it also did not hold pressed creases very well, if at all.  The pattern was otherwise super easy to make though, and I think I may try it again with a super lightweight cotton woven or knit instead.

Monday, June 21, 2010

Shirring mania

I know a lot of people hate shirring, but I've always loved it.  It feels sort of like magic to take a boring old tube of fabric, sew a bunch of lines through it, and voila! It's a dress!  I've made a decent number of shirred dresses at this point, but I recently discovered something that I've never seen mentioned before: all elastic thread is not created equal.  I had previously always bought the same kind of elastic thread at the same store, but last time I was there, they were no longer carrying it.  They had Guterman elastic thread, but a friend had warned me that the Guterman didn't work very well.  So instead I bought a different kind somewhere else. 

Well, the other day, I finally ran out of the spool I was using (I'm not 100% sure what kind it was since I threw away the packaging long ago) and went to wind a new bobbin from the new package only to realize that this elastic thread looked and felt totally different.  Not only was it not as stretchy, it was also much thinner.  This did not bode well. 

Rather than risk messing up a dress I was only halfway done with, I decided to go and hunt for different thread.  I came back with two more spools from two different stores and did test runs of all three on 5" x 25" strips of lightweight woven fabric (same as the dress I'm currently making).  I hand-wound a bobbin with each of the three different kinds of thread and then shirred 5 rows on each strip; tension: 6, stitch length: 4, each row approximately 3/8" apart.

IMG_1915 by you.
Strip #1 (Top)
Designer's Choice Elastic Sewing Thread
bought at Hancock Fabrics
64% Polyester, 36% Rubber
Finished length: 13"
After steaming: 9 1/2"

Strip #2 (Middle)
Dritz Elastic Thread
bought at Jo-Ann Fabrics
28% Polyester 72% Rubber
Finished length: 15"
After steaming: 11" 

Strip #3 (Bottom)
Stretchrite Elastic Sewing Thread
bought at Hobby Lobby
42% Polyester, 58% Rubber
Finished length: 9"
After steaming: 8" 


As it turns out, the brand and/or rubber content makes a huge difference!  The Designer's Choice was the the thinnest and felt the least stretchy, so I was surprised to see that it actually shirred up tighter than the Dritz, which had the highest rubber content.  The Stretchrite was far and away the most effective, and I suspect that it's what I had previously.  I'll also note that it was the cheapest, although I think that Hobby Lobby's notions are generally cheaper than Hancock and Jo-Ann.  Each spool has 30 yards, so one usually goes pretty far.  I don't think I've had to buy more than one a year.  Even so, I think next time I'm there, I may stock up, just in case.

Oh, and just for kicks, I also tried machine-winding bobbins for the Dritz and Designer's Choice threads and sewing 5 rows on shorter strips of fabric.  I was hoping that the tighter, more uniform wind would make them gather more when sewn.  I was shocked and disappointed to see that they both actually seemed to perform slightly worse.  So I guess I'm stuck with hand-winding.  Bah.

[Edited to add:
I forgot to see how much more these would shrink up after applying some steam to them from the iron.  Each strip did gather up a bit more and I've added it to the stats above. (Thanks, Jacki, for reminding me!)]

Olivia dresses

A friend requested that I make a dress out of Olivia fabric for her daughter.  She originally requested a simple A-line dress with criss-cross straps, so I loosely traced one of E's dresses to make a simple little pattern and then sewed a couple tubes to make the straps.  I rolled the bottom hem on my serger to keep as much of the length as possible.  I originally left the straps un-tacked down in the back so that I could customize them to the right length, but then we decided to leave them that way and make it into a halter dress.

IMG_1856 by you. 

IMG_1892 by you.

IMG_1893 by you.

Of course, once E saw her friend's dress, she insisted that I make a matching one for her too.  I made the top band a bit bigger to try and get more length out of it for my tall girl, but I realize now I should have adjusted the width too. 
Here's the promised pic (excuse the weird face, she was not being very cooperative).

IMG_1914 by you.

Thursday, June 10, 2010

Summertime and the living is...busy!

Ack!  How is it that it's been more than a month since my last post?  Well, needless to say, I've been busy both with life in general, and with crafting. 

First up is a whole mess o' crayon rolls.  Most of these were ordered by friends, but then I decided that while I was at it, I may as well to make extra to keep on hand.  I won't bore you with pics of every single one, just the cute ones. ;)


IMG_1784 by you. 


IMG_1782 by you. 


IMG_1780 by you.


Next is yes, you guessed it, another apron!  I have to say, I thought I'd get really sick of these, but I haven't.  I just love seeing how the different fabric combos turn out.  I think the embroidery on this one really makes it pop too.
IMG_1843 by you.


Hm, what else....Oh for teacher appreciation week, I took a page out of my friend Nicole's blog and made up some therapy sacks for E's preschool teachers.  I used wheat berries scented with a little lavender oil and tied them up with a little ribbon and the same poem that Nicole used.  I have to say, I was a bit shocked at how much wheat I needed.  I bought 5 lbs and and used all of it to make these three sacks!  Yikes!  But I must say, these were very quick little gifties and I will definitely be making more in the future, especially around Christmastime.


IMG_1656 by you. 


Oh and for the first time ever, I've also been making some stuff for myself!  :) I'll save that for a separate post though.  More to come...

Monday, May 3, 2010

Playing catch-up!

Whew, has this month been busy!  After a trip to Chicago and a resolution to a minor health issue that left me too exhausted to work, I'm back to sewing like a fiend and catching up on my mountainous back-log of orders.

First up, some oven mitts and matching hanging dishtowels, made from super adorable matroyshka-themed fabric, which the customer special-ordered and had sent to me.  It was a heavier weight fabric, almost like a canvas, and by the time I was done making these, I'd really fallen in love with it.

IMG_1640 by you.

I had actually finished the oven mitts quite some time ago, but had a bunch of fabric leftover, so she requested some dishtowels with a piece added so you could hang them over an oven handle or the like.  I drafted the towel pattern myself and I'm really happy with how it turned out.  Definitely going to be making more of these.

Next is an apron knot dress, based on the Portabellopixie pattern, made from the same skull fabric I used for one of E's skirts. 


Last, but certainly not least, is a strapless shirred dress for the daughter of my favorite photographer, who also happened to take the pic of the little girl in the apron dress above.  Her daughter is really into maps, so this fabric was perfect for her!

 IMG_1647 by you.

Egg-o-rama

IMG_1595 by you. 
I realized that I never posted the fabric eggs I made for Easter this year.  I despise the plastic eggs, not just because they're usually filled with candy, but mostly because my child freaks out if I try to throw the actual eggs away, empty or not.  So I end up with plastic egg halves scattered all over my house for months, as I gradually sneak them into the trash.  Bleh.

Last year, I saw a couple different tutorials for making fabric eggs, one with a secret pocket and one without, and bookmarked them, thinking I'd give it a whirl. Of course, being the procrastinator that I am, I never got around to it.  But this year, I remembered to look the tutes over again a few days before Easter.  Hey, that's progress for me!

These were surprisingly easy and fast to make. I spent one evening digging through my scrap bag and cutting out as many pieces as possible, and then about an hour or so zipping them through my sewing machine.  The only really tedious part was hand-stitching the holes closed, but again, it was accomplished in just an hour or so in front of the TV, the night before.

The secret pocket eggs were neat, but while they're larger in overall size, the pocket didn't hold more than a jellybean or two.  My child couldn't quite dig the jellybeans out and, in her frustration, started biting them out, which then led to a sticky old mess inside.  Ew.  Next time, we'll stick to the regular old pocketless eggs, which were smaller and more nicely egg-shaped.

Sunday, April 11, 2010

And even more aprons

Ok, these are the last two aprons for a while, I promise!

Both of these were for little boys.  This first one was finished a couple weeks ago and the fabric was specifically requested by his mom.  I love the combo of the skulls and stars.

IMG_1285 by you.

I had a harder time finding the right fabric for this second one since his mom did not want a specific theme, like cars, trains, etc.  Have I mentioned how hard it is to find good boyish fabric?  I'm very happy with this combination of stripes and dots though.  I think it's nicely all-purpose and could be used for a boy or a girl.

IMG_1367 by you.

I'm currently sewing as fast as I can to finish up a couple dresses and a few baby gifties before I head out of town next week.

LinkWithin

Blog Widget by LinkWithin