
I know there are only a few days left before Christmas, but there's still a little time left to whip up a few quick gifties. So I figured why not go ahead and put up my very first tute?
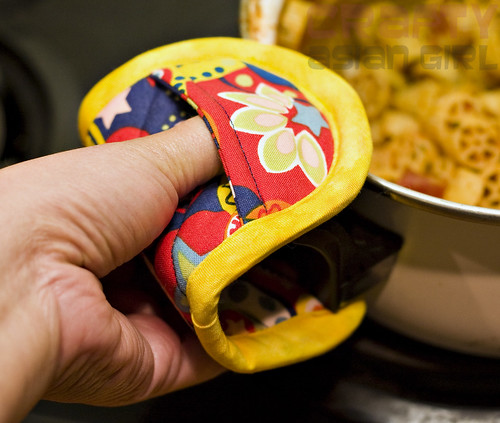
I love to bake, but I hate oven mitts and find most other potholders bulky to use. I've always wanted something that I could use to quickly grab a cookie sheet out of the oven or a hot plate out of the microwave. I remembered seeing this blog post a while back about making little round pads that had pockets for your fingers. I wanted something slightly different, so I thought I'd give it my own spin. This is a great way to use up scraps and other odds and ends from your stash. I actually had all the supplies necessary to make these already on hand - ah, the benefits of being a fabric hoarder.
This makes one pair.
Supplies:
Supplies:
- Enough fabric to cut four 4"x7" rectangles and four 4"x 2 1/2" rectangles; half a fat quarter would be more than sufficient
For the purposes of this tute, I'm going to assume you're using 2 different fabrics, one for the front, and one for the back of each pad.]
- Cotton batting - about 1/4 yard
- Insul-Bright - enough for two 4"x7" rectangles
- Binding/bias tape - about 1 yard of 1" single fold (or 1/2" double fold)
Like I mentioned above, this is a great way to use up odds and ends, so the amounts given for the supplies are approximate. The pieces for the finger pocket are pretty small, so you can definitely get by with scraps.
In case you're unfamiliar with Insul-Bright, it is, as the name implies, insulated batting. It's good for hot or cold, so you can use it for potholders, lunch bags, etc. It is usually found with the interfacing and sold by the yard. I had bought some over a year ago with the intention of making a lunch bag for E, but well, that never happened. I'm happy to have a use for it now.
 I made my own pattern from brown paper grocery bags, but you can just print out the handy dandy electronic version I made by clicking on the image to the right.
Instructions
1. For each PAIR of hot pads, you'll want to cut:
2 BODY pieces from Fabric 1
2 BODY pieces from Fabric 2
2 BODY pieces from Insul-Bright
4 BODY pieces from Batting
2 POCKET pieces from Fabric 1
2 POCKET pieces from Fabric 2
2 POCKET pieces from Batting
Here are pics of the pieces for just one pad. Yes, there is a fair amount of cutting involved, but if you're making a bunch, do it in front of the TV; it goes by more quickly that way. ;)

2. Next, take one of each of the POCKET pieces. Place the fabric RIGHT sides together. Then take one piece of batting and place on bottom.
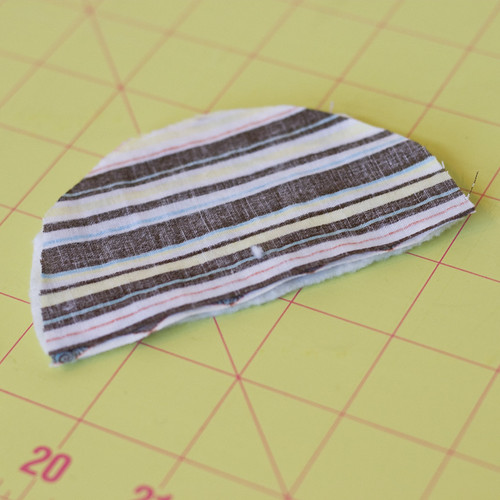
3. Stitch along the straight edge, leaving a 1/4" seam allowance.
4. Turn the right sides out, and press.

5. Topstitch along the bottom, leaving a 1/4" seam allowance. Set aside.

6. Make a sandwich of BODY pieces in the following order:
Fabric - right side DOWN
Batting
Insul-Bright
Batting
Fabric - right side UP
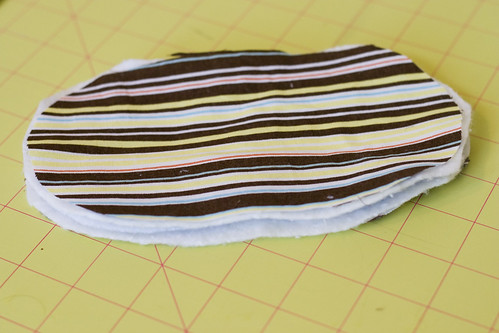
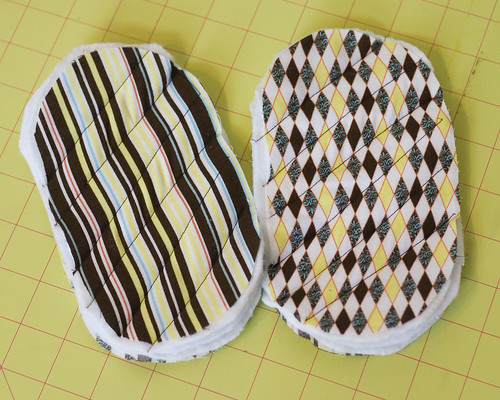
7. Quilt together. You can do this however you prefer - straight lines, criss-cross, swirls, circles, etc. I did diagonal lines across, about 1" apart. Because the sandwich is so thick, I didn't pin, but I tried to hold the pieces together as tightly as possible to minimize shifting. You may want to trim the edges after quilting.
8. Baste the pocket piece along one end of the body.
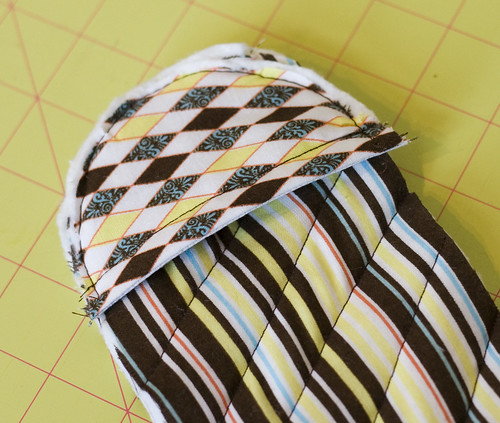
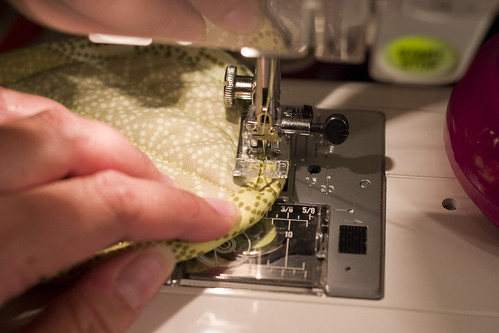
9. Apply binding. Because of the curves on these pads, I recommend stitching the binding on the "right" way, by opening it up sewing along the crease, then folding and stitching again. There's a great video tutorial on how to do it on the Angry Chicken Blog, so I'm not going to go into detail on the step-by-step, but here are some pics of the process.
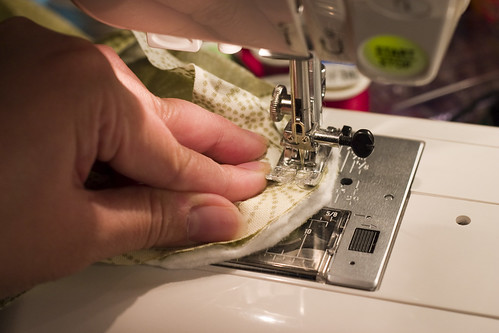
Here it what it looked like after I sewed all the way around with the binding unfolded:
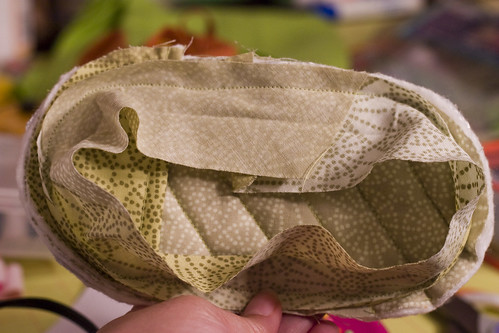
And then after I flipped it over to the back:
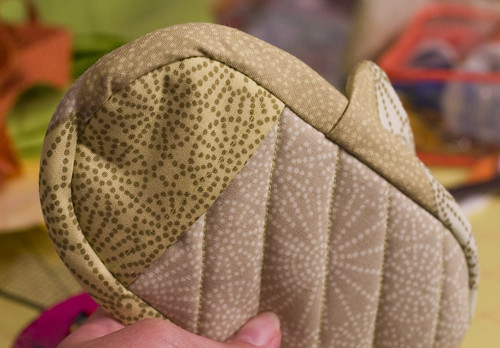
I'll warn you, the bulk of the pad can make this part a bit tricky, especially if you've never worked with binding before. I highly recommend using wide binding and going slowly around the curves. This was easily the most time-consuming part for me, after cutting all the pieces. It took me a few tries to get it looking nice and clean on both sides.
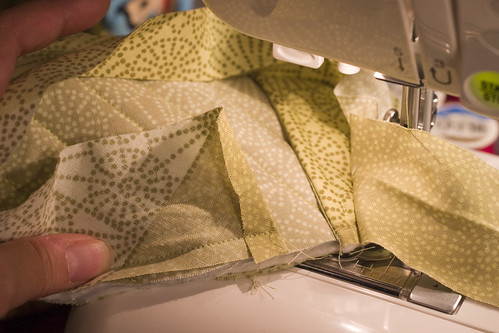
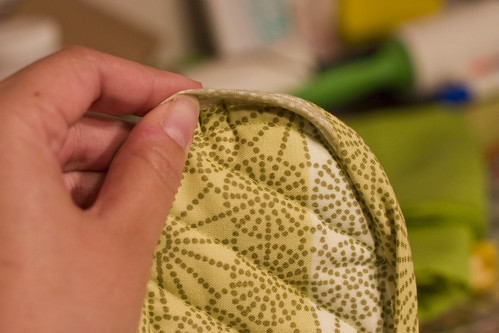
The key is, when you're folding the binding over and stitching the second time, you want it to be folded over just enough to catch the back edge, but you don't want it folded so far over that you end up with a flap, like this.
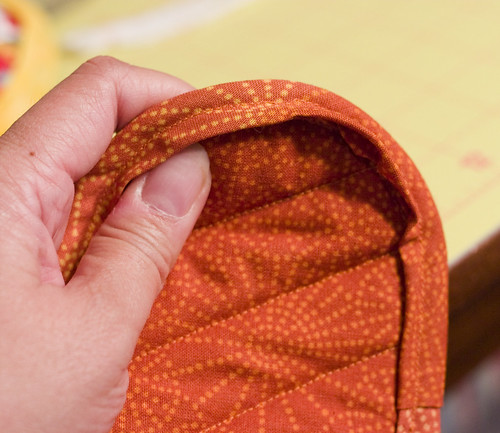
Needless to say, that one ended up ripped out and redone. *sigh*
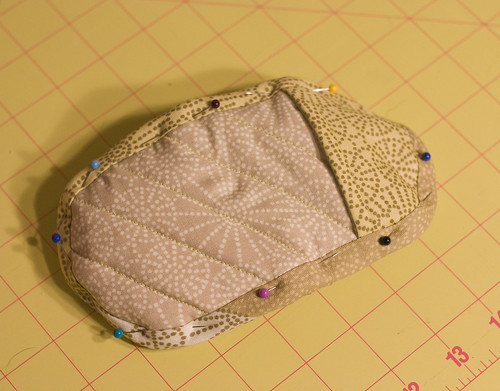
After folding it over, I pinned it like crazy, even though I generally hate pinning this way and it resulted in me getting jabbed more than a few times.
Here it what it looked like after I sewed all the way around with the binding unfolded:
And then after I flipped it over to the back:
I'll warn you, the bulk of the pad can make this part a bit tricky, especially if you've never worked with binding before. I highly recommend using wide binding and going slowly around the curves. This was easily the most time-consuming part for me, after cutting all the pieces. It took me a few tries to get it looking nice and clean on both sides.
The key is, when you're folding the binding over and stitching the second time, you want it to be folded over just enough to catch the back edge, but you don't want it folded so far over that you end up with a flap, like this.
Needless to say, that one ended up ripped out and redone. *sigh*
After folding it over, I pinned it like crazy, even though I generally hate pinning this way and it resulted in me getting jabbed more than a few times.
Side note: I'm obsessive about matching, not to mention stingy, so I made my own bias tape, which in the effort to save time, I merely creased in the middle. Yes, I'm a glutton for punishment. Basically, you cut fabric into strips on the bias (45 degree angle), then sew the strips together and press. I'm not going to go into more detail than that because there are a ton of great tutorials on how to cut and press to make your own binding. Obviously, the store-bought kind would work just fine too and take a lot less time.
Once that's done, voila! You have hot pads! I'm going to have to pull a bit of a bait & switch on you and show a different completed pair since I need to find matching fabric to cut and make binding for the pair shown in the first few pics.
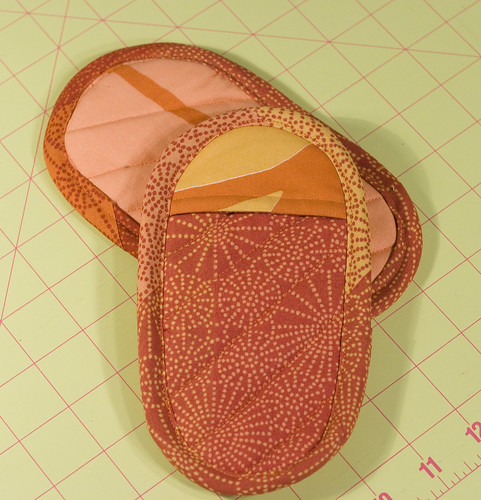
This is definitely a project you could knock out in an evening. I spent 3 evenings cutting and sewing almost a dozen pairs, assembly-line style. But again, a lot of that time was spent making binding, so if you use store-bought, you could probably do it a lot faster.
Feel free to make as many of these as you like for friends and family, but please don't sell them.
I hope that this was helpful to someone out there. I'd love to hear any feedback! This is my first tutorial though, so go easy on me. ;)
42 comments:
that's awesome and I love your fancy pattern!
oddly enough, I don't have any Insul-bright.
I'm going to make these as soon as I get my sewing stuff unpacked! :)
These are great! I hate oven mitts too and always wondered why we have to cover our whole hand when all we really need to protect are our fingertips. Nice job!
Fancy stuff sister! Love em.
I've been making these for a long time now. I saw some in a catalog and said "I can make those." So I did. However, I put two pockets on mine. One for your fingers and one for your thumb. They are best used for taking things out of the Microwave than the oven. You are right about the bias tape, sewing it on the "right" way. I found out it is the best way.
This is an outstanding tutorial. Of course I've ripped out seams five times because I thought I knew what was coming and that was a major mistake. These are cute and functional; also you can use fabric that fits the recipient to make them extra special.
Love your pattern. The directions are easy to follow and the finished product is terrific. Thank you for sharing your talent.
Thank you for sharing your talent. Love the directions, easy to follow and the finished product is terrific.
why doesn't it work out when i make the pockets
LOL awesome tute....makin a dark-blue pair for my boyfriend with old washcloths folded up for batting...maybe I'll make a pair for my brother too. YAY!
On step 2, don't you put fabrics right side together?
@Sylvia, yes, you are right! I don't know how I've missed that for so long. Changing it now and to all who have had problems, so sorry for the mistake!
Great! I can't wait to try these...
Thanks for your time and effort to post this... I'll watch for your next one, too. (No pressure...LOL)
What an awsome idea. Hope you Pattened it cause they will show up on tv soon. Love the size and bright colors. Definately will add to my "must make" list. Thanks
GREAT tutorial- if you could put the directions on/into a word document, it would be easier to print out :) Your work is amazing!
Would it be ok with you if I made some of these for our boutique for our 25th anniversary Quilt Guild Celebration and Quilt show. The guild as a whole makes different projects to be sold at the boutique and the profits help support our programming for the guild. I would, of course, give you credit for the design with a link to these instructions. Please let me know. Thanks so much for these directions, I've made quite a few for Christmas this year with wonderful reviews!
Crafty Asian Girl....great tutorial. Will look forward to more. Have sewn since I was 9 (now 68) and still don't know it all. I love when young women have something cool for me to learn. I have a group of friends that will receive these as part if their Christmas gifts. Great job. Thanks!
could you tell me the finished size of this? I printed the pattern link, but I think they printed way too big!
sara
sssowers@hotmail.com
The finished size of these should be about 4x7 inches. If you are having problems with the pattern printing too small, make sure your browser isn't re-sizing the image by doing a right-click and choosing "show full-size" or something to that effect.
@Miss P, I'm totally fine with people making these as gifts, fundraising, or charity. I only ask that people not sell from the pattern for profit. :)
great tute! i am also getting gigantic pattern pieces no matter what i try, however, i appreciate the time and effort you took to make the tute, your words and pictures are truly great!
question: i wonder if I could hand sew down the bias binding after partly machine sewing it in step 9?? (sorta like the 2nd part of binding/finishing a quilt?) hand sewing would take longer but i thought it would be less fiddly under the sewing machine? what do you think?
Thanks for the tute!!! Love theseQ I am the same way, i have small hands and sometimes just want a small potholder. I made one based on measuring your pattern on the screen... Will work for The Jolly Green Giant. Tried again. Very cute!
I want to make these soooo bad ....but the pattern prints out way to big. Any suggestions?
@bookwormbethie - I think you could definitely handsew the binding! In fact, it would probably look much neater that way. I have no patience for handsewing, so I'm resigned to just using the machine. ;)
@Anonymous - if you are printing from your browser, make sure that when you go to print, you UNcheck the box marked "scale to fit" or something to that effect. Please let me know if that helps. :)
I am trying to print out the pattern, but get 18 pages of the tutorial instead. I am not sure what I am doing wrong. Any ideas? Love the pattern, want to make some for Christmas presents.
I am working on these now, but I am afraid to start the binding part. I bought single fold and double fold. Which one do I use? Thanks.
Sue- right click on the picture of the pattern, click Save As, or Copy, then paste it into Word. It will print out that way.
I just took some scraps I got from the Supply Closet (in Wholly Craft if you are in Cbus) and made a beautiful owl hot pad! Thanks so much for sharing! My little girl is going to love this!
Just what I need for removing hot boiled eggs from my egg cooker too. I really like this style. I hate the bulky pot holders too, though I do must use good mits when I'm handling my large covered cast irons pots - 450 degrees - when making artisan bread. I'm going to make a few of these for myself. I'll try adding the extra pocket on a couple of them to see whether I prefer 1 or 2 pocket finger pot holders. Wonderful idea to use up scraps too. Thank you very much for this tutorial!
These are so adorable!! Thank you so much for sharing. I totally am going to try these out. Great tutorial!
Tianna @ www.alittlebitme.com
I too was having issues getting this to print in a normal size so I saved the pattern to my desktop and then opened word and clicked 'insert picture' and pasted the pattern into the document and ta-da!! Perfect!
Thanks so much for sharing. I was looking for something use up all of my scraps of vintage fabrics and I so need some of these for my kitchen. You're exactly right -- pot holders these days are too thick and bulky so these will be perfect!!
these are so cute! we are having a fundraising event in the village, to raise money for Cancer charities - I'm going to make a few of these to include in the raffle. thanks so much for a great tutorial xxx
I like that,thank you
SYLVIA,
if you leave wrong sides together,your bias tape will HIDE the
raw edges.
Hi,
This is really cool. Always had a tough time as i didn't really like baking gloves and the usual hot pads. will try making a pair first as am just trying out sewing...if i can manage to get it right will make a bunch for friends and family as i know they'd love it! your pattern is super cute and sensible at the same time!
well almost done with my first pair... attaching the bias tape is a bit difficult because of multiple layers of fabric but i guess will get used to it... looks nice already and will make a few more soon
thanks for your lovely tutorial..
My finished item is 6 1/2" x 11", not 4"x7". Why are they so big? I wanted small ones. I used the pattern. Any help as to what I do wrong would be greatly appreciated.
I bought several sets at a craft festival several years ago and now mine are worn out. I have been looking for this since. My have ceramic magnets to sit on top of the stove vent hood. I am retiring and plan on making these for Christmas gifts. Thanks
6.5 x 11 might make a good potholder for taking a casserole out of the oven - as long as you have a pocket on each end to slip each hand into!
I wanted to make something like this (have to work out sizes) to steady a jar coming out of the canner (jar lifters at the top but I'm always afraid I'm going to drop the jar). Ball is now selling them but they're expensive. Need something waterproof inside, b/c once the batting gets wet from the canning jar, it doesn't insulate. Does anybody have any ideas for something flexible but waterproof and heatproof?
Hi! This tute is so helpfull. Definately a gift for my sister and my mom...they will sure love it!
Thank you!
Hello,I think you done a swell job,you are very kind to share your things with every one.Thank You Sheila.Happy Holidays.
I was able to print the pattern correctly by clicking it to open it up, right click & select "copy image", paste the image into Word, and then resize the image. Had to be sure "ruler" was selected under "View" in Word. Then I just made the image about 4 inches wide using the ruler as a guide. Looking forward to making these for some friends. Thanks for the tutorial!
Thank you for this great tutorial...it was just what I was looking for. A sweet waitress at our local Mexican food restaurant was using a horrid thin little worn pad and I said looks like you need a new one. She agreed and I said I'll make you one. She gave me her first name so I could embroider it on it and now she will have the perfect plate pad.
Post a Comment