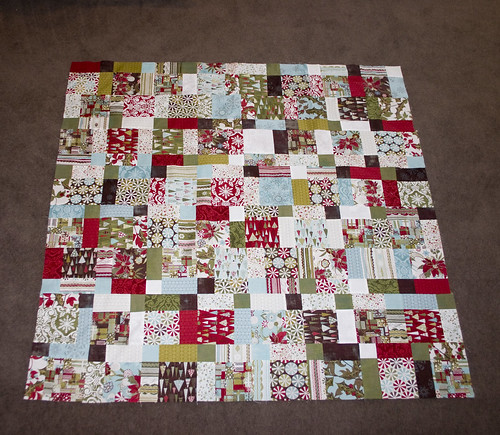
Sorry as usual for the lack of posts, but life has gotten in the way of crafting. I recently found out that our beloved dog has renal failure, so I've been too busy worrying and tending to her to be very productive. Here's a pic of my sweet girl in her prime, back when we lived in Chicago. I have, however, still managed to finish a few items in the last couple weeks, mostly commissions for friends.Black and white pompom hat for a toddler. I don't usually make hats with the squared-off top like that, but I think I may start. With the pompoms, it's super cute!And this one is one of my new favorites - owl hat!My friend's son is obsessed with owls and she asked if I could make an owl hat for him with some extra soft yarn since he's been having issues with hats being scratchy. I was really excited to find some yummy wool/cashmere yarn (Debbie Bliss Como) at my LYS in what I think are perfectly owl-y colors. I came up with the pattern on my own, and I'm pretty happy with how it turned out. His eyes and beak are 100% wool felt, and stitched on by hand.E was also very excited about the owl hat, so I of course now I'm making her one too. But being the cheapskate I am, hers is made from Lion Brand's Wool-ease Thick & Chunky, which I got on sale not too long ago.Currently, I'm working on another commission (a football themed hat in yummy wool/bamboo yarn), and I'm also making slow but sure progress on the Christmas quilt. I'm determined to have that thing done by Christmas, come hell or high water! However, in a bout of insanity, I decided I wanted to hand-quilt it. Let's just say it's not going so well right now. There may be a total about-face in the near future.Here's some pics of the finished quilt-top and the back.
And I mean that quite literally. I think I mentioned at the beginning of the summer that I had bought a "layer cake" of Christmas fabrics (moda's ultra-yummy Figgy Pudding line) with the intention of making a big quilt. Well, only about 4 months later, I finally got started. It's odd. I never in a million years thought that I would take up quilting, but after making one for E's toddler bed, I've totally been bitten by the bug. Something about the excuse to buy so many different yummy fabrics is irresistible to my fabric-hoarding self.As usual, I got a bit overambitious with this one. I decided that instead of doing straight squares like last time, I'd try to get a bit more fancy and do a pattern. After googling around and reading up on the basics and such that I'd skipped last time around, I settled on what's called a "disappearing nine-patch" pattern. I was drawn to it partly because it looks way more complicated than it is, but also because it can be done in so many variations, each with its own distinctive look (one of my favorite was this one, which used almost all black and white fabrics, with a splash of red in the center of each 9-patch).Basically, what I ended up doing was cutting each of my 10" layer cake squares into four 5" squares. Then I sewed those into 9-square patches. Here's all the 9-patches, laid out together.After all the work involved in sewing & squaring off these patches, I was sorely tempted to just leave it like this. But I decided to push on and, holding my breath, cut each 9-patch into quarters, like so:This felt like it took FOREVER, especially squaring everything off, but I finally ended up with 64 squares. Then I spent a while arranging them on the floor until they were "random." After all that, sewing them together was a snap, although as usual, there was a lot of ironing involved.Here's the quilt top so far. I'm pretty happy with it. I had held off on ordering any yardage for the backing, binding etc. because there are so many colorways and I wanted to see exactly how the pattern was going to look before settling on coordinating fabrics. The big disadvantage to waiting was that a lot of this line is now sold out. I did manage to find a few different fabrics that I'm going to piece together for the border, backing and binding, so I'm hoping it'll all work out.I'm on a bit of a knitting kick of late, so it may be a while before I get back to this quilt, but I WILL have it done by Christmas!!
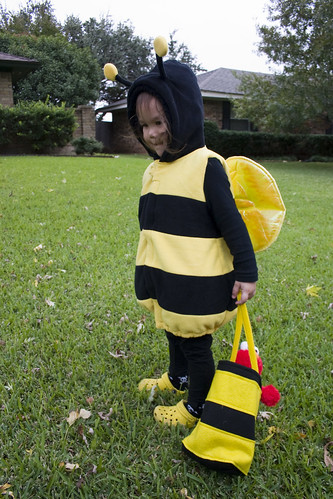
For once in my life, the lack of posts here has not meant I've been slacking! Just so busy working on so many various things that I haven't had time to finish enough to post.Here's the lone Halloween-related item I made this year:Sadly, it's not the costume, but the striped goody bag. I opted not to make E's costume this year. She is notoriously moody when it comes to wearing the things I make her, and I knew that if I spent a lot of time sewing her a costume only to have her refuse to wear it, I would be crushed/furious. So instead, I bought her this simple, but cute bee costume from Old Navy. It was basically a fleece vest with wings and antenna on the hood, so not only would it be easy to get on and off, it would also be highly adaptable to any variations in weather. True to form, as soon as I showed her the costume and asked her to try it on, she refused. This continued until literally minutes before the party we attended. I actually whipped this bag up the morning of the party after being hit by a wave of guilt that I hadn't made her costume. It's about as simple as it gets: yellow felt stripes appliqued onto black felt, then folded and sewn down two sides to make a bag. I did flatten the bottom into a gusset of sorts, but that's about as fancy as it got. I thought it made a pretty cute accompaniment to her costume, and it was WAY cheaper than the $12 Pottery Barn Kids version (although I'll concede that the PBK one is a lot cuter). If I'd had a little more time and energy, I probably would have found a way to add some wings, but oh well.My other major accomplishment this week was finishing the Stella Pixie baby hat that a friend had commissioned for her newborn baby. I absolutely adore the Cascade Heritage yarn that I used to make it, and I'm more than a little excited that I have enough leftover to make something for E too. A couple minor warnings for anyone else making this: first of all, even knitted to gauge, it's big. Since this was for a newborn, I made this a full size smaller than the pattern originally called for and cast-on 8 sts less than the smallest size they had listed. I read this same complaint on a few other blogs, but of course, not until after I'd already started mine. The other complaint is that the pattern I linked to on Etsy's Storque blog has an error in it (the buttonhole section towards the end), so I would recommend downloading the PDF link they have instead, which comes from the publisher. I struggled for a while with the buttonhole part, which it made no sense, before finally giving up and doing a different kind.Here's a pic of it on one of E's dolls. It's missing the bottom strap portion, but you get a better idea of the pixie shape when it's on a head.Last, and sort of least, there's this random stripey hat that I've been working on here and there for the last few weeks. I started it mostly to use up a few odds and ends that I had laying around, but I also wanted to try out an idea I'd seen where you knit the earflaps first and then incorporate them into the hat round. I hate picking up stitches almost as much as I hate seaming, and this was a nice compromise. This was also a nice chance for me to practice my "jogless jog" striping.My original intention was to make a hat for E. Well, of course, it ended up HUGE so now I think it's going to be a hat for me, haha.


